Dot Matrix VHDL and FPGA Course
Learn advanced VHDL design methodologies and verification strategies
Are you learning VHDL? Do you still feel like you couldn’t manage an FPGA project on your own?
Learn what they don’t teach you at the university; how to create a real-world FPGA design from scratch to working prototype.
The Dot Matrix LED Controller FPGA Course teaches you proven VHDL methodologies that will increase your confidence as an FPGA engineer.
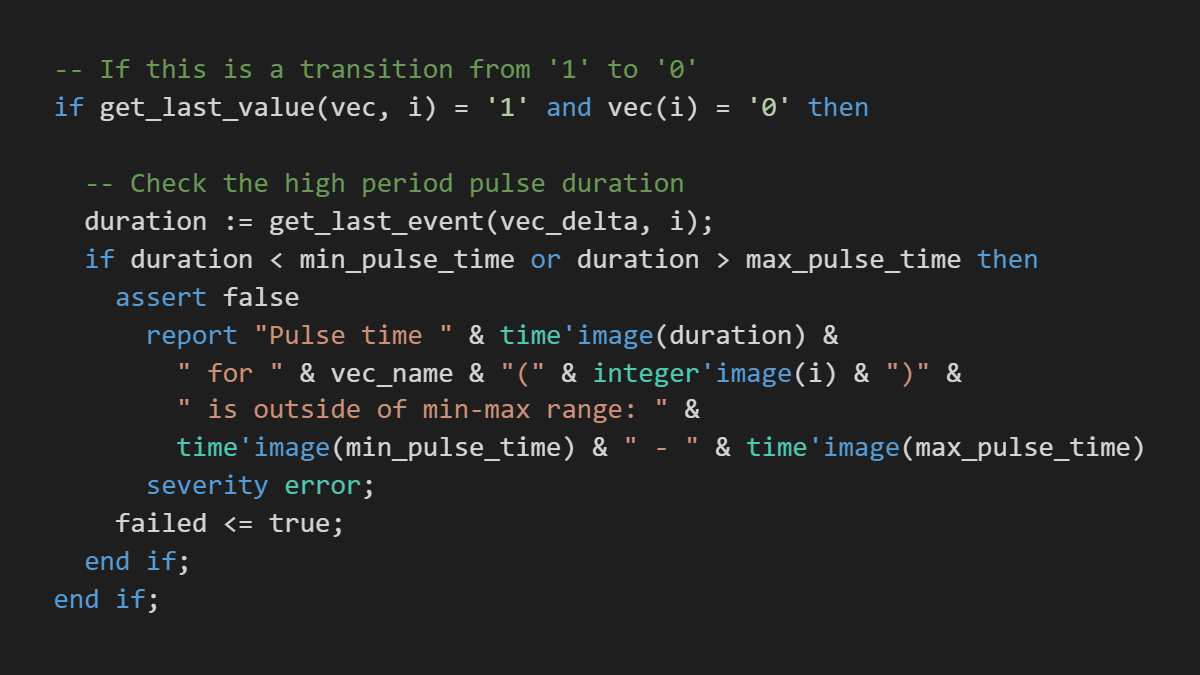
Trial and error is not a viable strategy when developing hardware. Learn how to structure your project and create a suite of self-checking testbenches as a professional FPGA engineer.
Get it right the first time you power on the chip.
The lectures teach you valuable skills for understanding how each code line translates into digital logic.
This course will take you from the beginner or intermediate level to being able to understand and use advanced VHDL coding constructs.

This is a hands-on course, meaning that we learn while creating something useful, not just theory and constructed examples. We are building something very real, an FPGA controller capable of rendering characters on a dot matrix LED display.

Advanced VHDL Coding
Use the VHDL language to its full extent. Learn how to create dynamic data structures like protected types and access types; VHDL classes and pointers.
Let the language do most of the work by utilizing generics, VHDL signal attributes, and VHDL-2008 features.

Simulation Strategies
Create self-checking VHDL testbenches like a professional FPGA engineer by using packages, records, components, processes, functions, and procedures.
Divide and conquer complex testbenches by using verification components. Reuse them to save development time and cost.

Synthesize and Implement
We will synthesize each module individually at the end of the sections, allowing you to understand what kind of logic every code line creates.
Finally, we will do the pin assignment and create clock constrains for the top module, before programming the FPGA.
To my astonishment, it worked the first time we powered on the chip. How could it be?
It was my first serious FPGA project. Two of us were juniors, but the other half of this team of four were veterans who had been around programmable logic since the days of the EPROM PLDs. We had been developing this FPGA for almost a year, and this was the day the PCB arrived.
Now, imagine developing a software project for months and months, and having it working the first time you run the program. Not very likely. FPGA engineers don’t have the luxury of quick turnaround time, we have to hold our code to a higher standard.
Respin is not a word any project manager likes to hear.
Manufacturing PCBs is expensive and time-consuming. Not to mention the cost of a silicon respin, should your VHDL code be part of an ASIC project. Companies who engage in VHDL development all have strong demands for performance, that’s why they’re using FPGAs in the first place.
The FPGA which I was developing at the time was for an aerospace project. As you can imagine, the consequences would be dire if the FPGA malfunctioned as a result of a logic error. Still, I can sleep well at night with the knowledge of how robust our verification regime was.
You can only create what you can test.
This statement holds true in VHDL and FPGA development. That’s why most of the new features of the VHDL language are meant for testbenches, not for synthesis. The quality of your code is largely governed by how well your testbenches are performing.
For that reason, this course focuses heavily on testbenches and verification. The emphasis is on structuring your testbench suite in such a way that you never lose the overview, while at the same time enabling you to reuse code multiple places throughout the design.

Analog Schematic
Early in the course, I will present the supporting analog schematic, as well as how dot matrix LED displays works.
As an FPGA engineer, you will have to know how to interpret analog schematics, not necessarily how to create them.

Breadboard Layout
You have the option to build your own prototype by purchasing the parts and following the instructions.
The detailed layout of the breadboard, as well as the schematic, can be examined in the free Fritzing software.

Lab Testing
In the last section of the course, we power on the prototype and send characters to it from the computer.
You will see that we have very few surprises when we finally do program the FPGA, thanks to our testbenches.

Even though I’m a VHDL old-timer with 18 years of experience, I have found inspiration and new ideas from following the lectures.
I will introduce some of the concepts of modeling using advanced VHDL features in my project flow after taking this course.
I am particularly happy that the course follows a bottom-up approach in design, and that it teaches you to test each new module in depth before proceeding to the next. I also appreciate that the code for each lecture can be fetched from the included Git repository.
While other tutorials or learning resources focus on language syntax, this course teaches you how to approach a VHDL project.
The course is an investment for those who want to enter the FPGA design arena.
- Luca Colombini, Senior Design Engineer, CAEN
Adopt methodologies that work and save time on your journey
You can get a long way by yourself, but then you reach a plateau from where it’s hard to make further progress. You end up searching the internet, bits of information here and there. Save time and learn proven VHDL design techniques right from the start.

Like most classic programmers, I would have dived headfirst into a project and attempt to get things working mostly through trial and error. This method is fine for small projects in fast compiling languages, but in VHDL, not so much.
This course has taught me to take my time, especially with testing. A complete understanding of how all the modules fit together will give a much better and cleaner end result, and save a lot of time and stress on your part.
Jonas has taught me the importance of streamlining the design flow process with some neat tricks such as packages, self-checking testbenches and verification components (which from my experience, other FPGA engineers are unaware of).
Not only will this course teach you how to structure great quality VHDL code, but it will give you some general tools about how to check that the RTL is synthesizing correctly.
This course makes for an amazing head start introduction into the world of FPGA engineering. In areas like these, it is best to stay ahead of the curve and be thorough, as this will save you lots of time (and maybe money!) in the long run.
- Chris Hickling, PhD Student, Nuclear Fusion Physics at the University of Liverpool

Use the object-oriented features of VHDL in your design flow
Become more productive by using VHDL's high-level programming constructs. Take a step into the 21st century and start using dynamic data structures in your testbenches.
The majority of tutorials and books teach you syntax, language constructs, and code patterns, but they don't motivate you to use them. For example, I’ve never used protected and access types before, even though I’ve read about them.
This course, on the other hand, presents a complex project and decomposes it into simple tasks. It uses a problem-oriented approach: raise the problem first and then solve it using the appropriate VHDL concepts.
It fills the gap between books and university programs that teach bare language constructs and code patterns without the experience of working on real-life projects.
I am usually very reluctant to pay for content, but trying to make sense of large and messy GitHub projects comes with headaches and pain. Here, on the other hand, all the course materials are presented with great care by clear and understandable explanation, clear language and high-quality video.
- Dymkov Mikhail
How long do I have access to the course?
What are the prerequisites?
Which parts do I need to build the prototype?
Do I need to do the physical implementation?
Which software is used in this course?
Can I use a different simulator or FPGA board?
Why can't I buy the course at any time?
What if I have a question before I buy?
One-Time Payment
$297 $148.50
Pay in full and get permanent access
*Obsoletion discount
(See the info box below)
- Access to 126 video lessons over 17 sections
(avg. duration 8:50 minutes) - Git repository with the code for every lesson
- Schematic and layout for the breadboard
- Supporting documents within the lectures
- Certificate of Achievement after you complete the course
⚠ Warning: additional cost!
Lattice Semiconductor now charges over $350/year for the iCEcube2 software used in this course. It was free until April 2024.
BUY COURSE*Obsoletion discount
Notice:
I'm offering a 50% discount on this course because some original parts have become obsolete, including the 8x8 display.
But you can do the Dot Matrix course as a pure simulation exercise without building the physical prototype. We only use the hardware in the last of the 17 sections of the course.
The first 16 sections are simulation and synthesis exercises in the simulator and the Lattice implementation software (ModelSim, iCEcube2, and Synplify Pro).
You can find equivalent parts if you still want to build the prototype. It will work with a 5x7 LED display as well. I have updated the Read-only memory / Character map package lesson with an additional VHDL package that renders all characters on the smaller display.
Send an email to [email protected] if you have any questions.