
Professional VHDL simulators are more expensive than most individuals can afford. But fortunately, there are many free and legal alternatives that you can download and install.
Microsoft Windows is the easiest to install on, but many simulators also have a Linux version. FPGA vendors usually only support the Red Hat Linux distribution. But with a little effort, you can make it work in other distros, including Ubuntu.
Mac OS is the most challenging platform because there’s only one open-source simulator that works natively. I recommend installing another operating system in a virtual machine to get around the problem.
ModelSim / QuestaSim, produced by Siemens EDA (formerly Mentor Graphics), is one of the most popular HDL simulators. That’s why you will find many installation options for ModelSim on this list.
All free ModelSim versions are speed-restricted in some way. But they all look and feel the same, and they are sufficient, even for advanced VHDL projects.
Questa-Intel FPGA Starter Edition (ModelSim)
Works on: Windows, Linux (Red Hat or Ubuntu)
This is my favorite free Questa/ModelSim edition because it’s the most up-to-date version.
* Update (Feb 23th, 2022):
Intel recently replaced the free Intel-ModelSim version with Questa, a more updated version of ModelSim with some additional features. It looks and feels the same as ModelSim, except that Questa removes unused signals by default. Skip to the next subsection to see how to prevent that.
Download
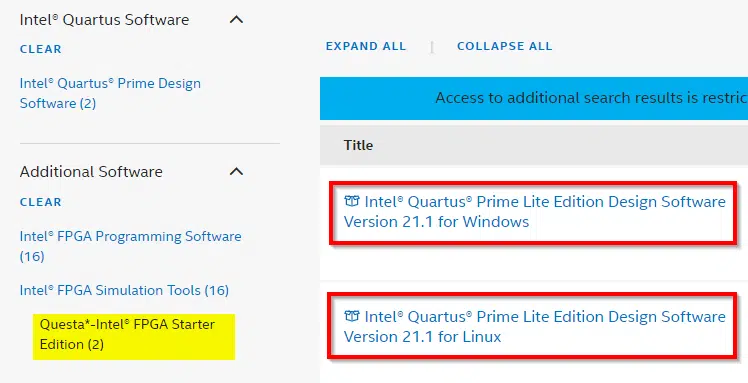
To download Intel-Questa for free, go to Intel’s FPGA Software Download Center and filter out Intel Quartus Prime Lite Edition Design Software for Windows or Linux, as shown in the image below.
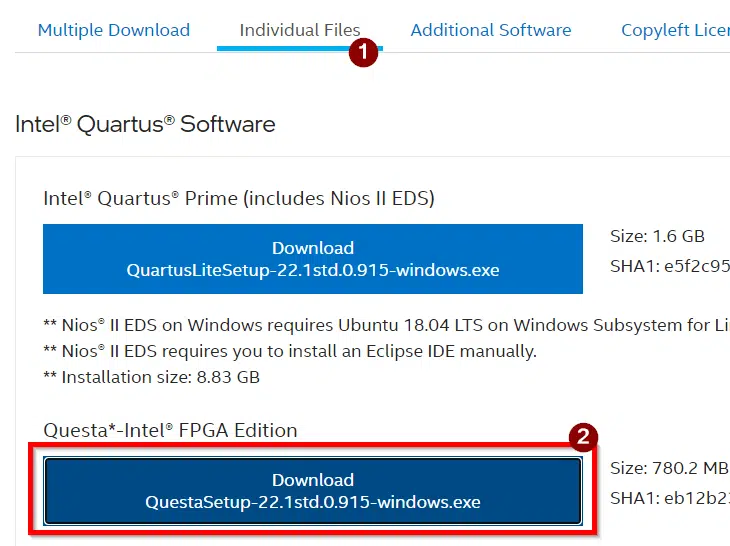
You don’t have to install Quartus Prime to use Questa. To skip that, click the Individual Files tab on the current page after following the previous step. Select the QuestaSetup Windows or Linux version, as shown below.
Installing on Windows
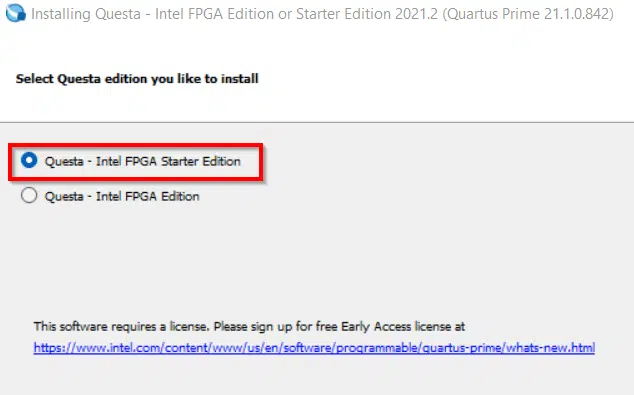
After downloading the installer, click the executable to start the installation. Select the Questa-Intel FPGA Starter Edition option when prompted, as shown below, because this is the free version.
License request
Next, you can request a free license from the Intel FPGA Self-Service Licensing Center. If you don’t already have one, you need to register for an account. Click the Register link on the page to create one.
! About possible Intel-Questa license request issues:
Some people have reported problems with getting the Intel License Center working, especially when using an old account. Try to clear the cookies from your browser, use an incognito window, or use a different browser.
One user told VHDLwhiz that you need to use a business email address and that Gmail or similar free email providers won’t work.
If you have an old Intel account, you may have to go through a re-registration process and upgrade to a Developer Zone Premier Account in order to download the license file.
As a last resort, you can create a new account using a separate email and use a VPN if you have access to one.
These claims are unverified by VHDLwhiz and come from users, and it’s not official information from Intel.
Select the Questa-Intel FPGA Starter Edition option after loggin in, as shown below.
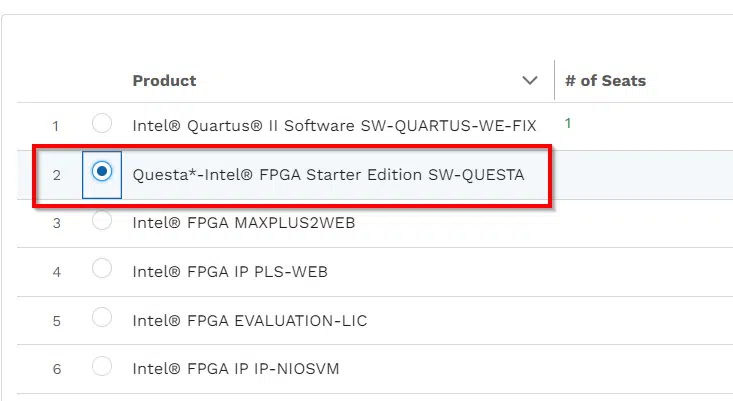
Select the number of seats (1, probably) and click Get License. On the next, page click New Computer, and fill in the fields, as shown below.
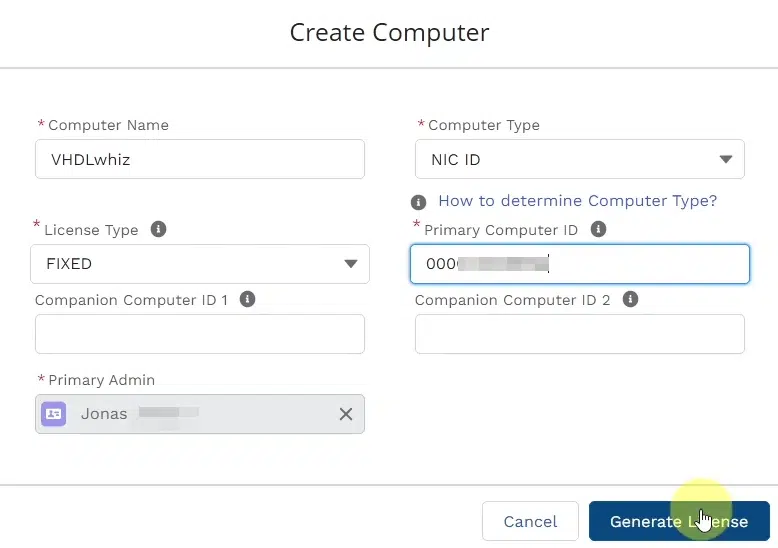
When requesting the license, you will have to enter the MAC address of your computer’s network card. On Windows, you can get it by opening a command prompt (WIN key +R, type “cmd” and hit Enter). Then, type “ipconfig /all” and hit Enter.
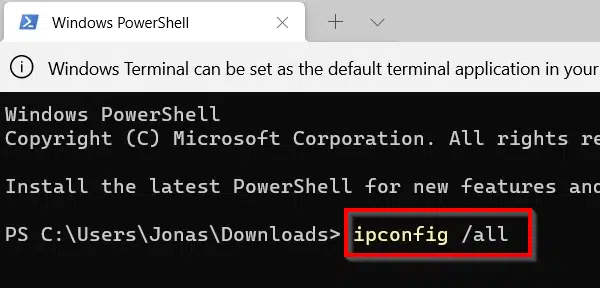
Look for the Physical Address entry, copy the hex string to an editor and remove the dashes before entering the digits in the license request form.

Finally, click Generate License and you will receive it in your inbox.
Copy the license file to the installation directory or anywhere you prefer.
License file setup
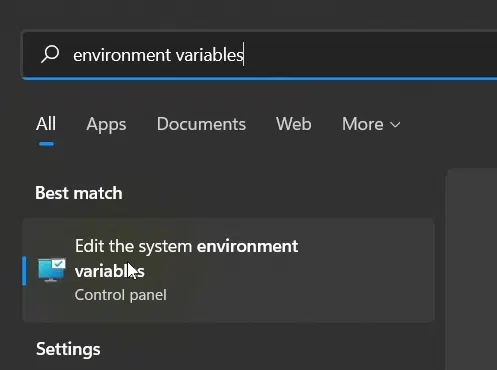
The final step is to create an environment variable named “LM_LICENSE_FILE” pointing to the file. On Windows, you can do that by hitting the WIN key and typing “environment variables”. Select the first option, as shown in the image below.
Enter LM_LICENSE_FILE as Variable name and the path to the file. Click OK.

You must log out and in again for the changes to take effect or restart Windows. You should now be able to simulate in Questa as usual.
How to stop Questa/ModelSim from optimizing away signals
Questa removes unused signals in the compilation’s optimization phase by default, while ModelSim didn’t. We usually don’t want that because the testbenches may contain signals just for observational purposes. The testbench doesn’t need them to function, but we still want to keep them for display in the waveform.
You can prevent this behavior by giving the -voptargs=+acc flag to vsim when simulating.
If starting the simulation through the GUI, select Start Simulation→Optimization Options→Options→Other vopt Options.
Enter “+acc” and click OK.
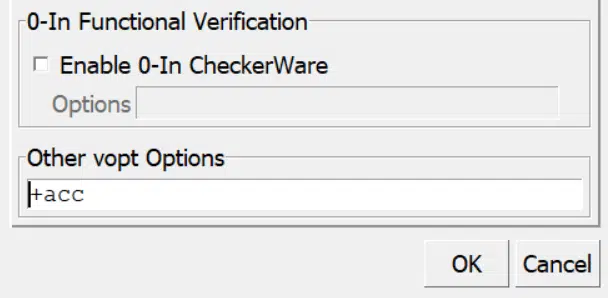
When you start the simulation, the -voptargs=+acc flag will be included, as shown below. Questa will still optimize the design but without removing objects.

Installing on Ubuntu
If you are running Ubuntu Linux, you need to do a few changes to make it work.
Follow my recipe to get going with ModelSim on Ubuntu:
How to make ModelSim from Quartus Prime Lite work on Ubuntu 20.04
(The recipe was made for the older Intel-ModelSim version)
Couldn’t open “transcript”: permission denied
By the way, if you get this error in Questa/ModelSim after installing:

It’s because the transcript file isn’t writable.
You can quickly fix that by going to the installation directory (C:\intelFPGA0.1\modelsim_ase) and editing the modelsim.ini file with administrator privileges. Change the TranscriptFile setting to a different path. For example, the installation directory, as shown below.

ModelSim PE Student Edition
Works on: Windows
The student edition of ModelSim only works on Windows. Don’t bother attempting to run it on Linux using the Windows Emulator (Wine). I’ve tried many times, and it’s futile.
Unlike the Intel edition, this option requires a license. *You can request one for free, and you don’t need a verified university address. It works with any email address, but you should review the terms and conditions before downloading to ensure you are eligible.
* Update (Feb 19th, 2021): It’s not possible to easily download the Student Edition as an individual anymore. Only institutions can apply for licenses in bulk now.
Click here to apply for ModelSim licenses for your learning institution
ModelSim Lattice FPGA Edition
Works on: Windows, Linux (Red Hat)
Since December 2020, the Lattice iCEcube2 bundle also includes a free version of ModelSim. It works out-of-the-box on Windows or Red Hat Linux.
Get it from the iCEcube2 Design Software page.
You will need to create a free Lattice account and generate a license that’s node-locked to your computer. If you already have a license for the previous version of iCEcube2, you must repeat the process. The old license file doesn’t include ModelSim.
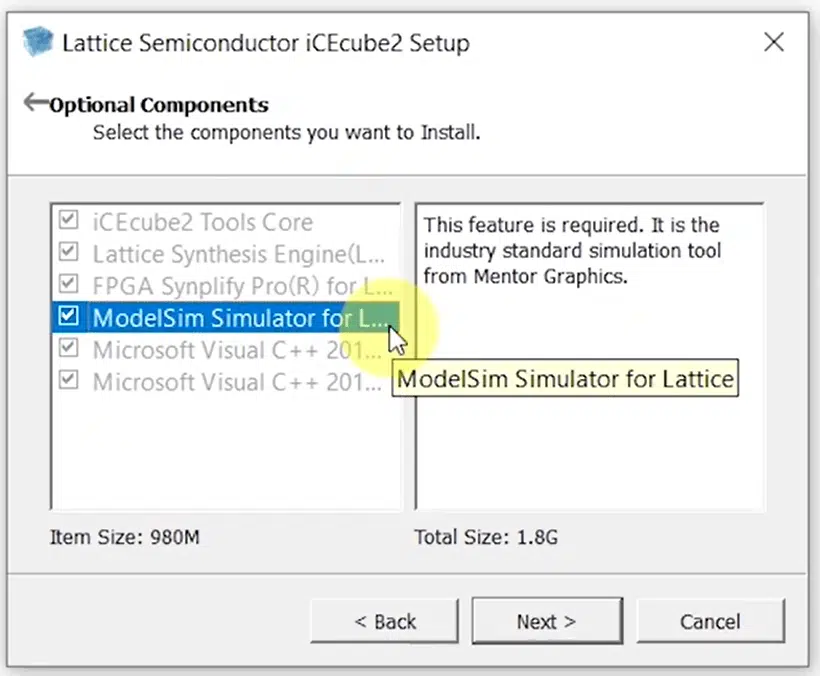
When you run the installer, you can choose to install iCEcube2 with or without ModelSim, as shown in the image above.
ModelSim ME (Microsemi Edition)
Works on: Windows, Linux (Red Hat)
Similar to the Intel and Lattice editions, there’s also an OEM version of ModelSim for Microsemi. It ships with the Libero SoC Design Suite, and you can download it using the link below.
Libero SoC v12.0 and later – Downloads
You will have to create a free account and generate a license.
Active-HDL Student Edition
Works on: Windows
Active HDL is a Windows-only VHDL simulator from Aldec that looks very much like ModelSim. And why wouldn’t it? It’s a winning formula.
Free Active-HDL Student Edition
The Aldec simulators are more affordable than ModelSim but still too expensive for most individuals. Fortunately, there’s a free student edition that you can download using the link above.
A verified .edu email isn’t required, but I encourage you to review the terms and conditions before downloading.
Xilinx Vivado
Works on: Windows, Linux (Red Hat or Ubuntu)
The Vivado all-in-one FPGA design software from Xilinx is available for Windows and Linux. It also contains a fully featured VHDL simulator (XSIM).
Vivado Design Suite – Downloads
Download the Self Extracting Web Installer using the link above, and make sure you select “WebPACK” when installing. That’s the free alternative.
You can use it with any VHDL project, but you would have to ignore all of the other features of the Vivado design suite; it’s heavily geared towards Xilinx.
Expect to use more Tcl scripting than with ModelSim if you want to create self-checking testbenches. The commands are also different, and I recommend diving into these two documents if you’re going to base your verification project on Vivado:
Vivado Design Suite Tcl Command Reference Guide (UG835)
Vivado Design Suite User Guide Using Tcl Scripting (UG894)
Installing Vivado on Ubuntu
In newer versions of Vivado, the GUI installer doesn’t work on Ubuntu. It quits before completing with a java.lang.IllegalStateException error printed to the console, as shown in the image below.

You can circumvent this error by using the Batch Mode Installation Flow, as described in the Xilinx UG973 document. After you have installed Vivado on Ubuntu, you can use the regular GUI version of the program.
GHDL / GTKWave
Works on: Windows, Linux, Mac
While the other simulators are available free of charge, GHDL is the only open-source alternative for Window, Linux, and Mac. Unlike the commercial simulators, GHDL is a console-based application; there’s no GUI. To view waveforms, you have to use a separate waveform viewer like GTKWave.
I applaud the initiative, but most companies use commercial simulators. Therefore, I have limited experience with GHDL.
You can install it easily on Ubuntu using apt:
sudo apt install ghdl gtkwave
And on Mac using Homebrew:
brew install ghdl
brew cask install xquartz
brew cask install gtkwave
Thanks to Shinya Yamada for sharing the brew recipe with VHDLwhiz.
VHDL simulator in a Virtual Machine (VM)
Works on: Windows, Linux, Mac
Sometimes, it’s easier to use a virtual machine than fight to install every program on your native system. That’s especially true on Mac, where it’s difficult to get the FPGA software working.
I run Windows 11 on my laptop, but I have an external hard drive with several Windows and Linux VMs that I use. It’s unproblematic.
The best is to install Windows 11 on the VM because it has the best support for FPGA software.
If you want Linux, I recommend going for a Red Hat-based system like CentOS or Fedora. Or Red Hat, of course, but that costs money, just like Windows. Most FPGA software officially only supports Red Hat, and you will have the least trouble installing on a closely related distro.
Or you can use Ubuntu and follow the steps in my walkthrough:
How to make ModelSim from Quartus Prime Lite work on Ubuntu 20.04
I actually used a VWware virtual machine while creating the video in the article above. If you use VMWare and Ubuntu 20.04 (Desktop), you will have the same setup as me, and it will work for sure.
EDA Playground
Works on: Windows, Linux, Mac
Finally, there exists a simulator alternative that you don’t have to install. EDA Playground is a cloud-based service that runs in your browser.
Click here to open EDA Playground.
You can choose between ModelSim, Aldec’s Riviera Pro, and several other simulators and FPGA tools after registering.
Unfortunately, the terms and conditions are quite strict, and that’s why I haven’t used it for any of VHDLwhiz’s tutorial videos. Broadcast or public presentation of the webpage is prohibited.
Are you missing something from the list? Let me know in the comment section below this article!


Thanks for your great liat it helps
Elico
You are welcome! ?
hello, thanks for the pretty extensive guide and it provide to be very informative and helpful. Is there anyway to obtain the modelsim pe student edition without the university license as seimens seems to have discontinued the individual installations.
I don’t think it’s possible to get the student edition as an individual. I recommend going for one of the free OEM versions. Apart from using slightly more disk space, they are equivalent to the former student edition.
Anyways it is no longer available since MG was purchased by Siemens !
Thanks for the great overview!
Small note on the ModelSim-Intel FPGA edtion: as of March 2021 (release nr. 21.1) the Lite edition no longer shows ModelSim as a separate download. I guess that has to do with the following: https://web.archive.org/web/20221006201430/https://www.intel.com/content/www/us/en/software/programmable/quartus-prime/model-sim.html
Fortunately, it is still possible to select the 20.1.1 version from the dropdown menu in your screenshot, and the download reappears.
Intel has replaced ModelSim-Intel with Questa – Intel FPGA Edition(includes Starter Edition). Fortunately, it looks and behaves like ModelSim. It’s still free, but you have to create an Intel account and generate a free node-locked license at the Intel FPGA Self-Service Licensing Center.
Edit the environmental variables in Windows or Linux and set this variable before starting Questa:
LM_LICENSE_FILE = path_to_your/License.dat
You may get an annoying message when you start Questa saying: The code execution cannot proceed because MSVCR120.dll was not found. I solved it by following the directions on this page.
So nice explanation.Thank you Sir for your support.
Good Luck
I’m glad you found it helpful. 🙂
I have mac OS with M1 chip. Is there any method to use vivado in this machine, If not what do you suggest to me?
I have minimal experience with macOS, but one thing that works for sure is to use a virtual machine (VM). You can install VMware, VirtualBox, or other virtualization software on your Mac. Then, install Windows or Linux, whichever you prefer, as a VM. Finally, install the FPGA software in the client operating system.
Thanks for this collection of tools. Another free tool for vhdl development (with language server) and simulation is https://vhdplus.com/blog/2021/11/15/blog-post/
Thanks! I will check it out.
Thank you very much for this article, very useful!
Just an observation regarding the ‘Questa optimizing away signals’ section, it wouldn’t be needed adding the +acc option flag, it would be sufficient to select “Apply full visibility to all modules (full debug mode)” in the: Start Simulation→Optimization Options . That should add the +acc flag automatically.
Thanks for the tip!
Hi,
How can I connect my Questa to NotePad++ verision 8.4.7? The plug “VHDL” not exsist in Questa.
Thanks regards.
I’m not sure what you mean here, but I can say that you don’t need to make any connections between Notepad++ and Questa. Just open the VHDL files in Notepad++ and edit them.
I think it’s possible to configure an external editor if that’s what you want, but it may not be a good idea. The problem is that you can’t place breakpoints and step through the code in an external editor.
It may be better to use Questa’s built-in editor for debugging. You can still edit the files in Notepad++ or VSCode without any form of integration.
I mean that when I write on notepad++ I want that will sync with VHDL QUESTA program (means that I don’t need any change do copy-paste from notepad++ to Questa, but will sync one to the other.
Thanks Regard
Oh, but you don’t need to have two copies of the files. Just edit the files you added to the Questa project, and the changes will be reflected when you hit compile in Questa.
Check out one of my older videos to see how to do that:
https://youtu.be/h4ZXge1BE80?t=185
I get “Unable to checkout a license. Make sure your license file environment variable(SALT_LICENSE_SERVER) is set correctly and then run ‘Imitil Imdiag’ to diagnose the problem.” when trying to run “Questa – Altera FPGA Starter Edition 2025.2 (Quartus Prime Pro 25.1std).