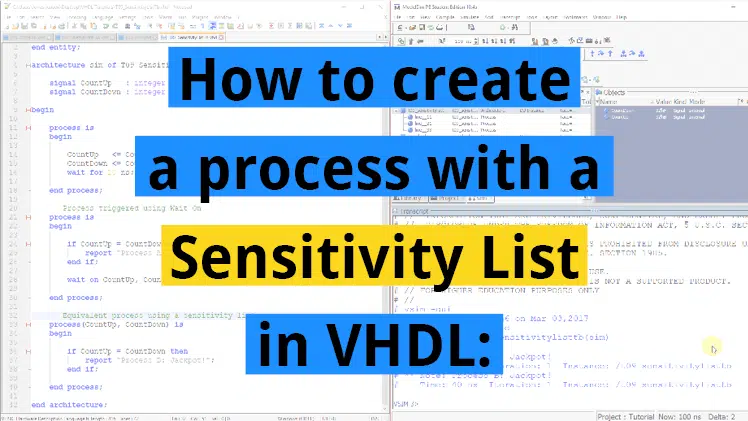
Text strings in VHDL are generally limited to fixed-length character arrays. That makes sense because VHDL describes hardware, and generic-length strings require dynamic memory.
To define an array of strings, you have to allocate space at compile-time for the highest number of strings you want to store. Even worse, you must decide on the strings’ max length and pad every occurrence to that number of characters. The code below shows an example usage of such a construct.
  type arr_type is array (0 to 3) of string(1 to 10);
  signal arr : arr_type;

begin

  arr(0) <= "Amsterdam ";
  arr(1) <= "Bangkok   ";
  arr(2) <= "Copenhagen";
  arr(3) <= "Damascus  ";
While that makes sense from a hardware perspective, it becomes cumbersome to use string arrays in VHDL testbenches. Therefore, I decided to create a dynamic string list package that I will explain in this article.
You can download the complete code using the form below.
Need the Questa/ModelSim project files?
Let me send you a Zip with everything you need to get started in 30 seconds
Tested on Windows and Linux Loading Gif.. 
Python’s list class
Let’s model our dynamic VHDL list after a well-known list implementation. Our VHDL string list will mimic the behavior of Python’s built-in list class. We’ll adopt the append(), insert(), and pop() methods from the Python list.
To show you what I mean, I will jump right in and open an interactive python shell to run some experiments.
First, let’s start by declaring a list and appending four strings to it, as shown below.
IPython 7.19.0 -- An enhanced Interactive Python. Type '?' for help.

In [1]: l = []
In [2]: l.append("Amsterdam")
In [3]: l.append("Bangkok")
In [4]: l.append("Copenhagen")
In [5]: l.append("Damascus")
The append() method is straightforward; it appends an object to the end of the list.
We can verify that with the pop() method, which removes an element and returns it to the caller. The argument specifies the position of the element to retrieve. By popping 0 until the list is empty, we get the content ordered from lowest to highest index:
In [6]: for _ in range(len(l)): print(l.pop(0))
Amsterdam
Bangkok
Copenhagen
Damascus
OK, let’s refill the list. And this time, we’ll use the insert() method to add the list elements out of order:
In [7]: l.insert(0, "Bangkok")
In [8]: l.insert(1, "Copenhagen")
In [9]: l.insert(0, "Amsterdam")
In [10]: l.insert(3, "Damascus")
The insert() function lets you specify at which index to insert the new item. In the above example, we created the same list as before. Let’s check that by traversing the list like an array:
In [11]: for i in range(len(l)): print(l[i])
Amsterdam
Bangkok
Copenhagen
Damascus
The Python bracket [] list operator doesn’t delete the item; it makes a list behave like an array. You get the slot content indexed by the number within the brackets, as you can see from the listing above.
Let’s empty the list by popping, but this time from the end of the list. A peculiarity of Python lists is that you can use a negative index to count from the last item instead of the beginning of the list. It works with the bracket operator and with the insert() or pop() methods.
By popping index -1, you always get the last item from the list. When we put that in a For loop, it will empty the list in reverse order:
In [12]: for _ in range(len(l)): print(l.pop(-1))
Damascus
Copenhagen
Bangkok
Amsterdam
You can use negative indexes to insert as well. In the last line of the example below, we’re inserting “Copenhagen” at index -1:
In [13]: l.append("Amsterdam")
In [14]: l.append("Bangkok")
In [15]: l.append("Damascus")
In [16]: l.insert(-1, "Copenhagen") # insert at the second last position
When we traverse the list, we can see that “Copenhagen” is now the second last element:
In [17]: for i in range(len(l)): print(l[i])
Amsterdam
Bangkok
Copenhagen
Damascus
Now, here comes the crux (but it makes sense).
When inserting to -1, the new item becomes the second last, but when popping from -1, we get the last item.
It makes sense because -1 refers to the position of the last element currently in the list. And when we’re popping, we are asking for the last element. But when we’re inserting, we ask to insert the new item at the position of the last element currently in the list. Thus, the new item displaces the final element by one slot.
We can confirm this by popping element -1, which returns “Damascus”, and not “Copenhagen”:
In [18]: l.pop(-1) # pop from the last position
Out[18]: 'Damascus'
The list now contains three elements:
In [19]: for i in range(len(l)): print(l[i])
Amsterdam
Bangkok
Copenhagen
It’s also possible to count the list length like this:
In [20]: len(l)
Out[20]: 3
And we can empty the list by calling clear():
In [21]: l.clear()
In [22]: len(l)
Out[22]: 0
As you can see, Python lists are versatile, and many programmers understand them. That’s why I will base my VHDL list implementation on this success formula.
The string list VHDL subprogram prototypes
To allow us to work with the string list like an object with member methods, we must declare it as a protected type. And we’ll place the protected type in a package with the same name: string_list.
The code below shows the “public” part of the protected type listing the subprogram prototypes.
package string_list is

  type string_list is protected

    procedure append(str : string);

    procedure insert(index : integer; str : string);

    impure function get(index : integer) return string;

    procedure delete(index : integer);

    procedure clear;

    impure function length return integer;

  end protected;

end package;
While the append(), insert(), and clear() procedures are identical to their Python counterparts, we can’t port the pop() function directly to VHDL. The problem is that we can’t easily pass dynamic objects out of protected types in VHDL.
To overcome this limitation, I’ve split the pop() functionality into two subprograms: get() and delete(). That will allow us to index the element first, like an array, and then delete it when we don’t need it anymore. For example, after we have printed the string to the simulator console.
The length() impure function will behave like Python’s built-in len() function. It will return the number of strings in the list.
The string list VHDL implementation
Protected types consist of two sections: the declarative part and the body. While the declarative part is visible to the user, the body contains the subprogram implementations and any private variables. Now it’s time to reveal the inner workings of the string list.
Leave your email address in the form below to receive the full code and ModelSim project in your inbox!
Need the Questa/ModelSim project files?
Let me send you a Zip with everything you need to get started in 30 seconds
Tested on Windows and Linux Loading Gif..
We will use a singly linked list as the internal data structure.
Read also: How to create a Linked List in VHDL
Because all the code that follows is in the body of the protected type, these constructs are not directly accessible outside of this package. All communication must go through the subprograms listed in the declarative region we discussed in the previous section.
Data storage types and variables
As you can see from the code below, we first declare an access type, a VHDL pointer to a string in dynamic memory. When we talk about dynamic memory, it’s not DRAM on the FPGA because this code is unsynthesizable. The string list is purely a simulation component, and it will use the dynamic memory of the computer running the simulation.
type str_ptr is access string;
type item;
type item_ptr is access item;
type item is record
  str : str_ptr;
  next_item : item_ptr;
end record;
After str_ptr, we declare item as an incomplete type. We have to do it like that because on the next line, we reference item when creating item_ptr.
And finally, we specify the full declaration of the item type, a record containing a string pointer and a pointer to the next element. There’s a circular dependency between the types item->item_ptr->item, and by first declaring the incomplete item type, we avoid a compilation error.
The protected type contains two variables, shown below: root and length_i. The item pointed to by root will be the first element of the list, array index zero. And the length_i variable will always reflect the number of strings in the list.
variable root : item_ptr;
variable length_i : integer := 0;
Append procedure
The append() procedure shown below is a shorthand notation for inserting a string at the list’s last position.
procedure append(str : string) is
begin
  insert(length_i, str);
end procedure;
As discussed in the Python example, it’s easy to insert at the second last position using index -1: insert(-1, str). But inserting at the last position requires the list’s length as the index argument. That’s probably why Python’s list has a dedicated append() method, and we will have one too.
Insert procedure
The insert procedure, shown below, works in four steps.
First, we create a dynamic item object by using the VHDL new keyword. We first create a list item object and then a dynamic string object to store in it.
procedure insert(index : integer; str : string) is
  variable new_item : item_ptr;
  variable node : item_ptr;
  variable index_v : integer;
begin

  -- Create the new object
  new_item := new item;
  new_item.str := new string'(str);

  -- Restrict the index to the list range
  if index >= length_i then
    index_v := length_i;
  elsif index <= -length_i then
    index_v := 0;
  else
    index_v := index mod length_i;
  end if;

  if index_v = 0 then

    -- The new object becomes root when inserting at position 0
    new_item.next_item := root;
    root := new_item;

  else

    -- Find the node to insert after
    node := root;
    for i in 2 to index_v loop
      node := node.next_item;
    end loop;

    -- Insert the new item
    new_item.next_item := node.next_item;
    node.next_item := new_item;

  end if;

  length_i := length_i + 1;

end procedure;
Step number two is to translate the index argument to an index that conforms to the list’s range. Python’s list.insert() implementation allows out-of-bounds indexes, and our VHDL list will allow it too. If the user references a too high or low index, it will default to the highest index, or element 0. Also, we use the modulo operator to translate any in-bounds negative indexes to a positive array position.
In step number three, we walk the list to find the node to insert after. As always, with linked lists, we must explicitly handle the particular case of inserting at the root.
The fourth and final step is to increment the length_i variable to ensure that the bookkeeping is up to date.
Internal get_index and get_node functions
Because of VHDL’s object passing limitations, we decided to split pop() into two subprograms: get() and delete(). The first function will get the item, and the second procedure will remove it from the list.
But the algorithm for looking up the index or object is identical for get() and delete(), so we can implement it separately in two private functions: get_index() and get_node().
Unlike insert(), Python’s pop() function doesn’t allow out-of-bounds indexes, and neither will our get_index() function. To guard against user error, we will raise an assertion failure if the requested index is out of bounds, as shown below.
impure function get_index(index : integer) return integer is
begin
  assert index >= -length_i and index < length_i
    report "get index out of list range"
    severity failure;

  return index mod length_i;
end function;
The get_node() function, shown below, takes it a step further and finds the actual object at the specified index. It uses get_index() to look up the correct node and returns a pointer to the item object.
impure function get_node(index : integer) return item_ptr is
  variable node : item_ptr;
begin

  node := root;
  for i in 1 to get_index(index) loop
    node := node.next_item;
  end loop;

  return node;

end function;
Get function
Because of the private get_node() function, the public get() function becomes rather simple. It’s a one-liner that fetches the correct node, unpacks the string content, and returns it to the caller.
impure function get(index : integer) return string is
begin
  return get_node(index).str.all;
end function;
Delete procedure
The delete() procedure also uses get_index() and get_node() to simplify the algorithm. First, we use get_index() to find the index of the object to remove, as shown in the index_c constant declaration below.
procedure delete(index : integer) is
  constant index_c : integer := get_index(index);
  variable node : item_ptr;
  variable parent_node : item_ptr;
begin

  if index_c = 0 then
    node := root;
    root := root.next_item;
  else
    parent_node := get_node(index_c - 1);
    node := parent_node.next_item;
    parent_node.next_item := node.next_item;
  end if;

  deallocate(node.str);
  deallocate(node);

  length_i := length_i - 1;

end procedure;
Then, we unlink the node from the list. If it’s the root object, we set the next item as root. Otherwise, we use get_node() to find the parent and relink the list to detach the item at hand.
Finally, we free the memory by calling the VHDL keyword deallocate and update the length_i bookkeeping variable.
Clear procedure
To delete all the items, the clear() procedure traverses the list using a While loop, calling delete() on each element until none are left.
procedure clear is
begin
  while length_i > 0 loop
    delete(0);
  end loop;
end procedure;
Length function
To comply with good programming practice, we provide a getter function rather than allowing the user to directly access the length_i variable.
impure function length return integer is
begin
  return length_i;
end function;
The difference will be unnoticeable for the user since you don’t need parentheses to call a function with no parameters (my_list.length). But the user can’t change the internal bookkeeping variable, and that’s a safeguard against misuse.
Using the string list in a testbench
Now that the list implementation is complete, it’s time for us to run it in a testbench. First, we have to import the protected type from a package, as shown on the first line of the code below.
use work.string_list.string_list;

entity string_list_tb is
end string_list_tb;

architecture sim of string_list_tb is

  shared variable l : string_list;
...
The protected type is VHDL’s class-like constucts, and we can create an object of it by declaring a shared variable of type string_list, as shown on the last line above. We’ll name it ‘l’ for “list” to replicate the Python example I presented at the start of this article.
From now on, we can use a software approach to access the list’s data. As shown in the testbench process below, we can reference a public subprogram by using the dot notation on the shared variable (l.append("Amsterdam")).
begin
  SEQUENCER_PROC : process
  begin

    print("* Append four strings");
    print("  l.append(Amsterdam)"); l.append("Amsterdam");
    print("  l.append(Bangkok)"); l.append("Bangkok");
    print("  l.append(Copenhagen)"); l.append("Copenhagen");
    print("  l.append(Damascus)"); l.append("Damascus");
...
I have omitted the complete testbench and run script to reduce this article’s length, but you can request it by leaving your email address in the form below. You will receive a Zip file with the complete VHDL code and a ModelSim project in your inbox within minutes.
Need the Questa/ModelSim project files?
Let me send you a Zip with everything you need to get started in 30 seconds
Tested on Windows and Linux Loading Gif..
Running the testbench
If you downloaded the example project using the form above, you should be able replicate the following output. Refer to “How to run.txt” in the Zip file for precise instructions.
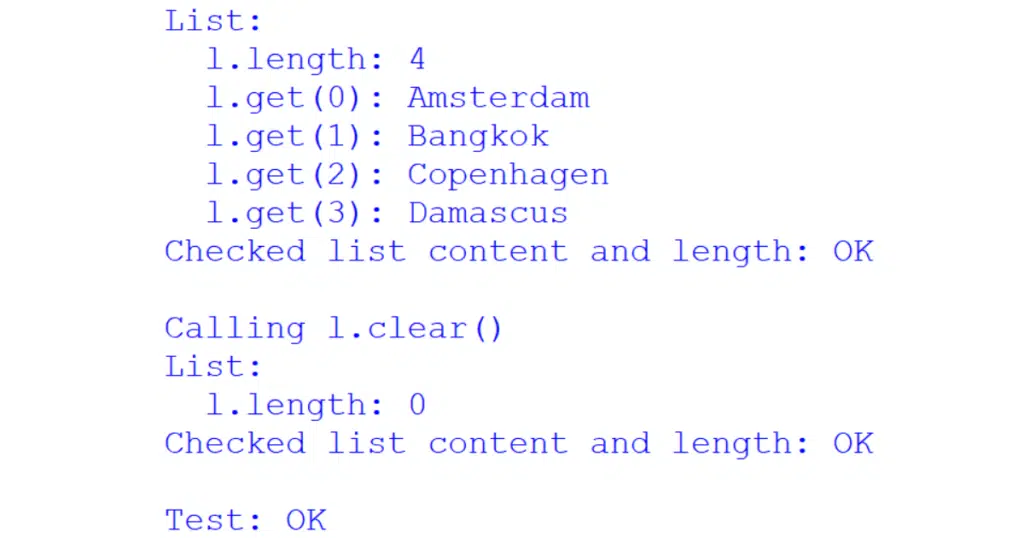
It’s a manual-check testbench, and I’ve made the test cases resemble my Python example as closely as possible. Instead of the pop() Python method, we use the VHDL list’s get() function followed by a call to delete(). That does the same thing.
As we can see from the printout to the ModelSim console shown below, the VHDL list behaves similarly to its Python counterpart.
# * Append four strings
#   l.append(Amsterdam)
#   l.append(Bangkok)
#   l.append(Copenhagen)
#   l.append(Damascus)
# * Pop all strings from the beginning of the list
#   l.get(0): Amsterdam
#   l.get(1): Bangkok
#   l.get(2): Copenhagen
#   l.get(3): Damascus
# * Insert four strings in shuffled order
#   l.insert(0, Bangkok)
#   l.insert(1, Copenhagen)
#   l.insert(0, Amsterdam)
#   l.insert(3, Damascus)
# * Traverse the list like an array
#   l.get(0): Amsterdam
#   l.get(1): Bangkok
#   l.get(2): Copenhagen
#   l.get(3): Damascus
# * Pop all strings from the end of the list
#   l.get(0): Damascus
#   l.get(1): Copenhagen
#   l.get(2): Bangkok
#   l.get(3): Amsterdam
# * Append and insert at the second last position
#   l.append(Amsterdam)
#   l.append(Bangkok)
#   l.append(Damascus)
#   l.insert(-1, Copenhagen)
# * Pop from the last position
#   l.get(-1): Damascus
# * Traverse the list like an array
#   l.get(0): Amsterdam
#   l.get(1): Bangkok
#   l.get(2): Copenhagen
# * Check the list length
#   l.length: 3
# * Clear the list
# * Check the list length
#   l.length: 0
# * Done
Final thoughts
I think the higher-level programming features of VHDL are underrated. While it’s not useful for RTL design because it’s not synthesizable, it can be beneficial for verification purposes.
Even though it may be complicated to implement, it will be simpler for the end-user, the person writing the testbench that uses the protected type. The protected type hides all the complexity from the user.
It only takes three lines to use a protected type: import the package, declare the shared variable, and call a subprogram in the testbench process. That’s simpler than instantiating a VHDL component.
See also: How to create a Linked List in VHDL
Tell me what you think in the comment section below the article!