
Course: AXI4 master in VHDL with a DDR3 benchmark demo
$69
Build a complete AXI4 bus master in VHDL, prove it correct with VUnit’s AXI slave models, then benchmark block RAM against DDR3 on an Arty board and see why AXI4 has bursts.
Description
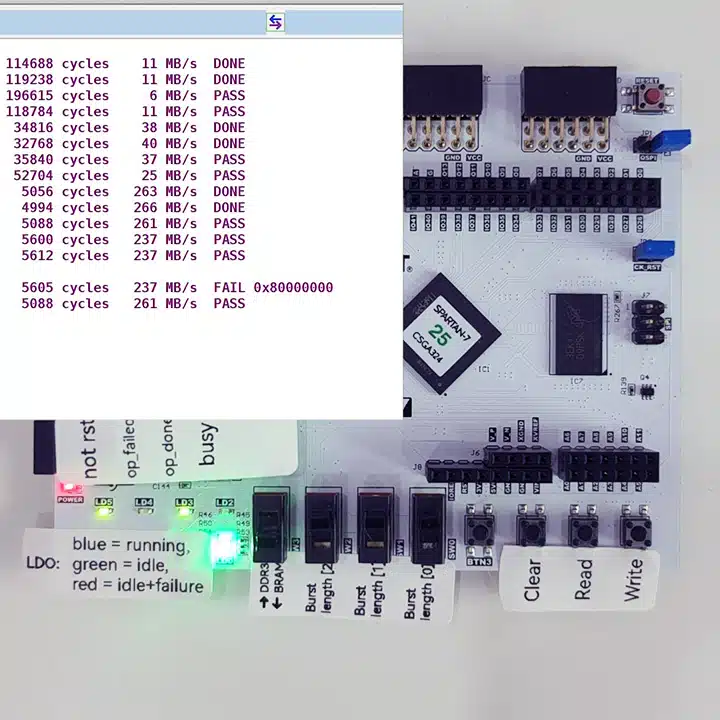
Flip a switch to select on-chip block RAM or the DDR3 chip, set the burst length with three more switches, and press a button. The FPGA fills the memory with a test pattern, reads it back, checks every word, and prints one line over UART with the cycle count and the throughput in MB/s. Every operation ends with PASS, or with FAIL and the address where the data went wrong.
But this course is about more than a memory benchmark. The real subject is AXI4, the memory-mapped bus that the FPGA world runs on. It’s the interface on nearly every IP block in Vivado, on the DDR controller, and between the processor and the fabric in every SoC design. Most of us only ever connect AXI in the block diagram and let the tools handle the protocol. In this course, you implement it yourself.
We write one substantial VHDL module by hand: the bus master (manager). It has a control state machine, a burst sequencer that splits any transfer into legal bursts and respects the 4 KB boundary rule, a pattern generator with a per-beat read checker, and cycle counters that turn every operation into a measurement. Everything around it comes from the Vivado IP catalog: SmartConnect, the AXI BRAM controller, and the MIG DDR3 memory controller. That split is deliberate, because writing one module and integrating it with professional IP is exactly how you will meet AXI at work.
The master is fully verified before Vivado even opens. VUnit’s AXI slave (subordinate) verification components act as a memory-backed slave that checks the protocol rules for us: the handshakes, the WLAST placement, and the 4 KB rule, even under random stalls on every channel. The complete testbench with twelve test cases is included as a download, and we break the data pattern on purpose to prove that the checker actually checks.
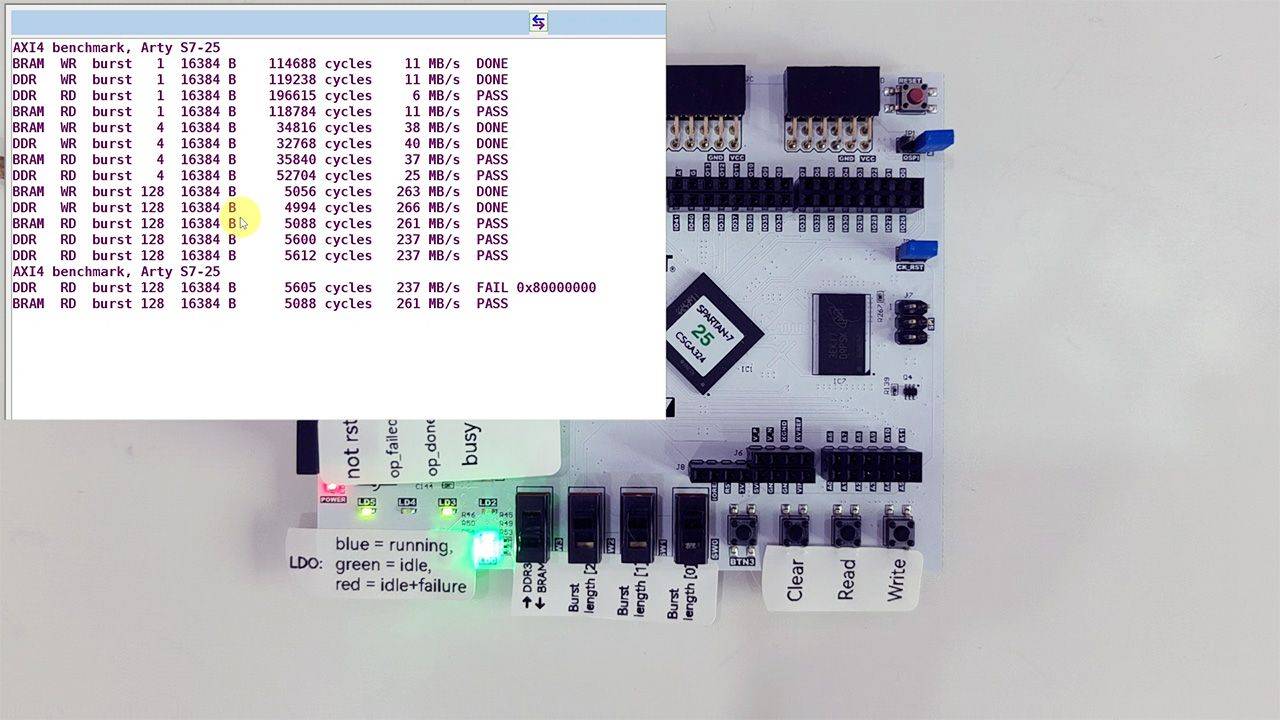
The payoff is the burst-length sweep on real hardware. At burst length 1, both memories crawl at around 11 MB/s. At burst length 128, the same design moves data at over 260 MB/s, closing in on the theoretical ceiling of the 32-bit bus. When the table builds up line by line in your serial terminal, you’ll know exactly why AXI4 has bursts, because your own design measured it.
The testbench runs on the VUnit framework. You don’t need to take my VUnit course first, as I will go through the testbench structure with you. But it’s the natural next step if you want to go deeper into the verification components.
This course is also available in the VHDLwhiz Membership.
The difference is that when you purchase this product, you get permanent access to the course, while the membership charges a monthly fee to access the content.
You can follow the first nine lessons in simulation with no hardware at all, and the verification story is complete without a board. You need the hardware below to run the DDR3 benchmark on your own desk.
Hardware used in the course
- Arty S7-25: Xilinx Spartan-7 FPGA (SKU: 410-352-25)
Resellers: Digilent, Mouser, DigiKey
(Other AMD/Xilinx 7-series boards with DDR3 also work if you select the matching board files and constraint file.)
Software used in the course
I use Windows 11 in the course. All the other software is available for free for Windows and Linux:
- Questa – Intel FPGA Edition(includes Starter Edition)
(Any version of ModelSim or QuestaSim will work) - AMD Vivado
(The free edition covers the Arty boards) - The VUnit test framework
(Installed with a single pip command; the course shows the setup) - Python 3
(VUnit runs on it; no Python programming required) - Microsoft Visual Studio Code
(Any editor will do) - YAT – Yet Another Terminal
(Any serial (UART) terminal program will do)
Course outline
The overview below shows the lessons in this course.

1 - Introduction
Welcome to the course! AXI4 is everywhere in FPGA designs. We'll build a bus master in VHDL, verify it in simulation, and run it on BRAM and real DDR3 memory.

2 - How AXI4 transactions work
Let's review ARM's AXI specification PDF to see how the five channels work. Interactive demos show the ready/valid handshake and the deadlock you get when a sender breaks the rules.

3 - AXI4 master entity and VUnit script
We'll define the entity for our AXI4 master with all five channel groups, and set up the VUnit run script that will compile and simulate the module in Questa.

4 - Finite-state machine outline
I will walk you through the state diagram for the master, then we'll code the FSM outline, including state names, reset values, and outputs with constant values.

5 - Burst sizing and the 4 KB boundary rule
Let's implement the idle and write issue states, and write the function that sizes each burst so it never crosses a 4 KB address boundary, which AXI4 forbids.

6 - Write data and response channels
Time to complete the write path of the state machine by streaming the data beats, asserting WLAST, and checking the slave's response on the B channel.

7 - Read path and data checker
The read path completes the master FSM, and the read data state doubles as the checker. Every beat is compared to the expected pattern, and the first error is recorded.

8 - Testbench with AXI slave VCs
VUnit's AXI slave verification components will check that our master follows the protocol. We'll start on the testbench by checking the reset values on the module outputs.

9 - The complete AXI4 master testbench
Let me walk you through all the test cases, break the data pattern on purpose to watch a test fail, and examine a transfer in the waveform.

10 - Board IO module
This module has supporting VHDL code to handle buttons, switches and status LEDs, as well as formatted UART output. Download it along with the constraints (XDC) file.

11 - Vivado block design
Let's build the block design in Vivado. We wire the master to the MIG, a BRAM controller and SmartConnect, sort out clocking and reset, and generate the bitstream.
12 - Live demo on the board
Finally, we program the board and run the design for real. We flip switches, press buttons, and sweep the burst length from 1 to 128 to see how far the throughput climbs on both memories.
This course is also available in the VHDLwhiz Membership.
The difference is that when you purchase this product, you get permanent access to the course, while the membership charges a monthly fee to access the content.
Reviews
There are no reviews yet.