Course: FFT on FPGA in VHDL with a real-time audio demo
$59
Learn how the Fast Fourier transform (FFT) works from the ground up, then use AI to build a real-time audio spectrum analyzer in VHDL, shown live on an OLED display from an FPGA.
Description
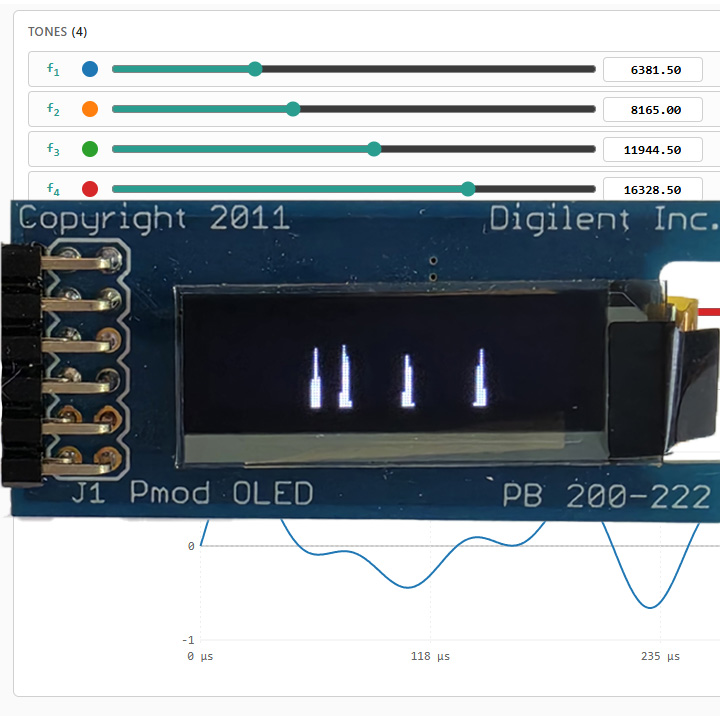
Feed audio into the line input, and 128 bars rise and fall across the display as the frequencies in the signal change. That’s what we build in this course: audio comes in through a Pmod I2S2 codec, a 256-point FFT written in pure VHDL turns the samples into a frequency spectrum, and a rendering pipeline draws the bars on a Pmod OLED in real time.
Vivado and Quartus come with ready-made FFT cores, and you should use them when you just need the functionality. But a ready-made core is a black box. You set a few parameters and it works, but you never see what’s going on inside. In this course, we open that box and learn how the transform actually works.
This is two courses in one. The first five lessons teach the theory: the Fourier transform, the butterfly operation, the discrete Fourier transform by definition, and how the FFT computes the same result at a fraction of the cost. I’ve created a set of interactive browser demos for these lessons, and they are included in the course so you can experiment with the concepts yourself.
The second half builds the hardware. A complete FFT with all its supporting modules is a bigger design than what fits into my usual format, where I write every line in front of you. That’s why we use AI to generate most of the VHDL in this course. I’m using Claude Code, but you can use any LLM that you prefer.
Of course, AI-written VHDL can’t be trusted blindly. We read through the generated modules and verify each one with a self-checking testbench in Questa. I also provide a testbench that prints an ASCII art representation of the OLED display, so you can see the spectrum analyzer working even if you don’t have any hardware at all.
You’ll also see what makes the design fit comfortably on a small FPGA. One butterfly module performs all the FFT stages in sequence, with intermediate results stored in block RAM, because there’s plenty of time between audio samples. The final lessons add the touches that make the analyzer behave well on real input signals: a Hann window that stops spectral leakage from smearing the bars, and an automatic gain control that keeps the display readable at any volume.
The audio input path and the display controller come from my audio mixer and Pmod OLED courses. You don’t need to take those first, as everything you need is available for download in this course.
This course is also available in the VHDLwhiz Membership.
The difference is that when you purchase this product, you get permanent access to the course, while the membership charges a monthly fee to access the content.
You can follow most of the course in simulation, but you need the hardware below to see the spectrum react to live audio.
The course videos are 1920×1080 (landscape aspect ratio).
Hardware used in the course
- Arty S7-25: Xilinx Spartan-7 FPGA (SKU: 410-352-25)
Resellers: Digilent, Mouser, DigiKey
(I use the S7-25 variant in the course. The S7-50 also works, or you can port the design to another Xilinx board with two Pmod connectors.) - Pmod I2S2: Stereo Audio Input and Output (SKU: 410-379)
Resellers: Digilent, Mouser, DigiKey, RS Electronics - Pmod OLED: 128 x 32 Pixel Monochromatic OLED Display (SKU: 410-222)
Resellers: Digilent, Farnell, Newark, DigiKey, Mouser, RS Electronics - A speaker with a built-in amplifier and a mini-jack input
(To hear the audio passing through the codec while the spectrum shows on the display) - Two mini-jack male-to-male audio cables
(One from the audio source to the Pmod I2S2 line in, and one from the line out to the speaker. I play music and test tones from my computer.)
Software used in the course
I use Windows 11 in the course. Except for the AI assistant, the software is available for free for Windows and Linux:
- Questa – Intel FPGA Edition(includes Starter Edition)
(Any version of ModelSim or QuestaSim will work) - AMD Vivado
(Or the implementation software for your FPGA architecture) - Claude Code
(Requires a paid plan. You can use any other AI coding assistant, or skip the prompting and use the finished code that’s included in the course.) - Microsoft Visual Studio Code
(Any editor will do) - Python 3
(For a few helper scripts and quick calculations)
Course outline
The overview below shows the lessons in this course.

1 - Introduction
Welcome to the course! Fast Fourier transforms are everywhere in signal processing. We'll build one in VHDL from scratch to make a real-time audio spectrum analyzer on an FPGA.

2 - Discrete Fourier transform basics
Learn how the Fourier transform works through interactive JavaScript demos covering frequency bins, the Nyquist criterion, aliasing, and windowing to prevent spectral leakage.

3 - Butterflies
The Butterfly is the single repeating primitive behind every FFT. See how its two inputs, twiddle factor, and complex-number rotation produce frequency bins from samples.

4 - DFT by definition
Let's expore the discrete Fourier transform with an 8-point demo to see how twiddle factors multiply inputs, why bin zero is the average, phase in complex numbers, and why it doesn't scale.

5 - Fast Fourier transforms
See how the FFT computes the same result as the DFT using stacked butterflies and twiddle factors, scaling at n log n instead of n squared, the key to fitting an audio FFT on a chip.

6 - Project setup
Set up the project for the Arty S7-25 board with the Pmod I2S2 audio input and OLED display, reusing existing VHDLwhiz projects and letting Claude Code wire the top module together.

7 - First Vivado implementation
Let's review Claude's generated top module, then set up the Vivado project and recreate the gain multiplier and Clocking Wizard IP cores needed to synthesize the design.

8 - Audio and OLED test
We'll fix the synthesis errors and make a few changes before we program the FPGA to confirm the audio loopback and OLED display still work, plus run the no-hardware testbench in Questa.

9 - Butterfly implementation
Have Claude Code implement the butterfly in VHDL with a separate entity, RTL, and behavioral model, plus a self-checking testbench that verifies it against a real-valued reference.

10 - FFT256 implementation
Let's ask Claude to build a 256-point FFT from the butterfly, unrolling the Cooley-Tukey algorithm into an FSM that reuses one butterfly and stores intermediate results in block RAM.

11 - Pipeline implementation
Let's build the modules that link the FFT to the OLED display, including stereo-to-mono, bin magnitude, bar mapper, and a bar renderer that writes each bin as a column of pixels.

12 - Live FFT
Add the new modules in Vivado, run the testbench, synthesize, and program the board to see how FFT bins are rendered as columns on the OLED display.

13 - Hann window
We'll fix spectral leakage by adding a Hann window module before the FFT, attenuating samples near the edges so spikes stay an even width across the band instead of smearing between bins.

14 - Automatic gain control
Finish the project by adding automatic gain control between bin magnitude and bar mapper, keeping bar heights steady as input volume changes, then test the complete pipeline on the board.
This course is also available in the VHDLwhiz Membership.
The difference is that when you purchase this product, you get permanent access to the course, while the membership charges a monthly fee to access the content.


Reviews
There are no reviews yet.