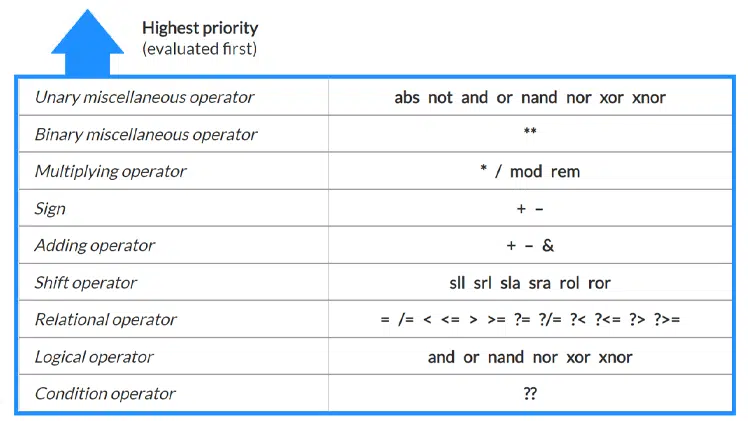
This article examines how we can use configuration constructs to create variants of a module or testbench without maintaining multiple versions of the file. We will also look at other use cases for configuration declarations in VHDL design.
Configurations have been part of the VHDL standard since the first version of the language. But still, many FPGA designers never use them, perhaps because few people understand how configurations work.
I find that unfortunate because it’s really not that complicated. Therefore, I will give my best shot at explaining how configurations work and how you can benefit from using them.
The example design
Let’s start with an uncomplicated design, and then introduce configurations after that. That’s one of the advantages of configurations; you can build them on top of your existing design as long as you use the component instantiation method. We will get to that later.
The initial example design consists of a testbench and a device under test (DUT).
Comparison module (DUT)
The module shown in the below listing implements the equality comparison operator. It sets the q output to true when a equals b. For all other combinations of a and b, q is false.
entity comparison is
  port (
    a : in integer;
    b : in integer;
    q : out boolean
  );
end comparison;

architecture rtl of comparison is
begin

  q <= a = b;

end architecture;
Testbench
Furthermore, I have instantiated the comparison module in a testbench, as shown below. Note that it uses the component instantiation method and not entity instantiation, as I recommended in the previous article. That’s because configurations only work with component instantiation; it’s a prerequisite, unfortunately.
architecture sim of comparison_tb is

  signal a : integer;
  signal b : integer;
  signal q : boolean;

  component comparison
    port (
      a : in integer;
      b : in integer;
      q : out boolean
    );
  end component;

begin

  DUT : comparison
  port map (
    a => a,
    b => b,
    q => q
  );

  SEQUENCER_PROC : process
  begin
  -- ...
  -- Download the example project to see the full testbench
The last part of the testbench is a sequencer process that sets the a and b inputs and prints out a, b, and q to the simulator console. There are three test cases: one where a is greater than b, one where a and b are equal, and one where a is less than b.
Download the example project
I have omitted the sequencer process from the testbench code listing to keep this article short, and because it’s trivial. But you can send the complete code to your inbox by leaving your email address in the form below.
Need the Questa/ModelSim project files?
Let me send you a Zip with everything you need to get started in 30 seconds
Tested on Windows and Linux Loading Gif.. 
Running the testbench
To simulate the testbench in ModelSim without configurations, we call vsim with the compiled testbench entity (work.comparison_tb) as an argument. From the transcript below, you can see that the DUT sets q to true only when the two inputs are equal.
ModelSim> vsim work.comparison_tb ; run 100 ns
# vsim work.comparison_tb
# Loading std.standard
# Loading work.comparison_tb(sim)
# Loading work.comparison(rtl)
# ** Note: a = 10, b = 5, q = false
#    Time: 10 ns  Iteration: 0  Instance: /comparison_tb
# ** Note: a = 5, b = 5, q = true
#    Time: 20 ns  Iteration: 0  Instance: /comparison_tb
# ** Note: a = 5, b = 10, q = false
#    Time: 30 ns  Iteration: 0  Instance: /comparison_tb
Introducing a second DUT variation
Suppose that we want to implement another comparison operator: greater than. We would then have to create another copy of the testbench, even though the two modules are almost identical and share the same entity. That’s unfortunate because we may have numerous similar modules. It’s going to be a mess if we don’t do something about it.
entity greater_than is
  port (
    a : in integer;
    b : in integer;
    q : out boolean
  );
end greater_than;

architecture rtl of greater_than is
begin

  q <= a > b;

end architecture;
The listing above shows the new greater_than module with the differing line from the comparison module highlighted. It’s just a variation of the comparison operator that we already have.
How configurations work (diagram)
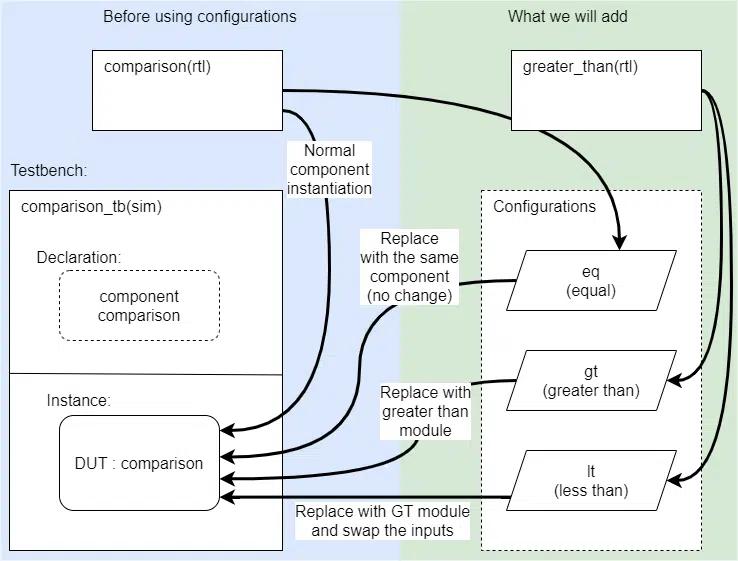
To demonstrate how you can use configurations to create variants of your design, we will create three versions of the testbench, without altering the original code.
The diagram below shows an overview of the current design and what we will add to it. At the moment, we are instantiating the comparison module in the testbench, and we’re not going to change that code. We will use configurations to change the instantiated module’s binding, effectively replacing it in the testbench.
The configuration declarations
If you wonder what a configuration looks like in code, I won’t keep you in the dark any longer. I will present the code in the next three subsections. We will put all three configuration declarations in the same VHDL file: comparison_conf.vhd.
The equality configuration
For completeness, I have included an empty configuration named eq at the top of the configurations file. It does nothing to the logic, but it will allow us to start the testbench in the simulator in the same way as the other configurations.
configuration eq of comparison_tb is
  for sim
  end for;
end configuration;
The greater than configuration
The second configuration block, on the other hand, changes the logic. We have to start the declaration with the keyword configuration, followed by a name, gt, that we will use later to identify it. Then, we specify the entity that will be the top module (comparison_tb) relative to this configuration.
configuration gt of comparison_tb is
  for sim
    for DUT : comparison
      use entity work.greater_than(rtl);
    end for;
  end for;
end configuration;
And finally, we reach into the architecture (sim) with a special kind of For loops that will match instances and replace them. In this case, we swap the DUT instance for another component of type greater_than.
The less than configuration
The third and last declaration code block (lt) shows another interesting use of configurations. It’s similar to the previous one because we are replacing the DUT instance with the greater_than component, but I have added a port map that will override the one in the testbench.
configuration lt of comparison_tb is
  for sim
    for DUT : comparison
      use entity work.greater_than(rtl)
        port map (
          a => b,
          b => a,
          q => q
        );
    end for;
  end for;
end configuration;
If you look closely at the highlighted lines, you will see that I have assigned port a to signal b and vice versa. We are swapping the signals to make the greater_than module behave as a less than operator.
Simulating using configurations
There’s no special command to simulate a configuration in ModelSim. You just have to start the simulation with the configuration as the top module. The simulator will load the entity/architecture pair according to the code in the configuration block.
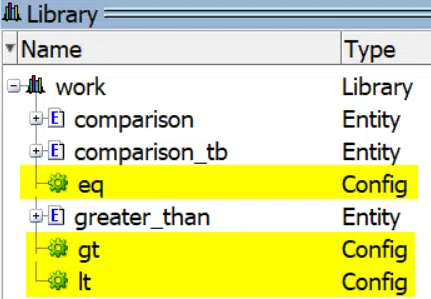
If we inspect the Library tab in ModelSim after compilation, we can see that our three configurations are there. As shown in the image above, they appear as Config type objects, but they will behave like entities.
Running the equality testbench
We named the equality configuration eq. To use it, we can start the simulation by supplying the name of the compiled configuration as an argument to vsim instead of the top module: vsim work.eq.
ModelSim> vsim work.eq ; run 100 ns
# vsim work.eq
# Loading std.standard
# Loading work.eq
# Loading work.comparison_tb(sim)
# Loading work.comparison(rtl)
# ** Note: a = 10, b = 5, q = false
#    Time: 10 ns  Iteration: 0  Instance: /comparison_tb
# ** Note: a = 5, b = 5, q = true
#    Time: 20 ns  Iteration: 0  Instance: /comparison_tb
# ** Note: a = 5, b = 10, q = false
#    Time: 30 ns  Iteration: 0  Instance: /comparison_tb
The listing above shows the output in the ModelSim console. We can see that it uses the comparison module and outputs “q = true” only when a and b are equal.
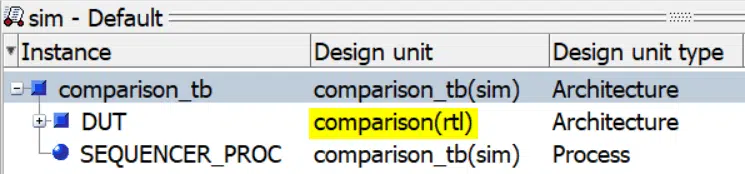
We can also check that the DUT instance is the comparison module in the Sim tab in ModelSim after we start the simulation, as shown above. Of course, the result is the same as when we ran the testbench directly since the eq configuration doesn’t do anything.
Running the greater than testbench
To run the greater than configuration, we specify the gt configuration within the work library when we start the simulation:
ModelSim> vsim work.gt ; run 100 ns
# vsim work.gt
# Loading std.standard
# Loading work.gt
# Loading work.comparison_tb(sim)
# Loading work.greater_than(rtl)
# ** Note: a = 10, b = 5, q = true
#    Time: 10 ns  Iteration: 0  Instance: /comparison_tb
# ** Note: a = 5, b = 5, q = false
#    Time: 20 ns  Iteration: 0  Instance: /comparison_tb
# ** Note: a = 5, b = 10, q = false
#    Time: 30 ns  Iteration: 0  Instance: /comparison_tb
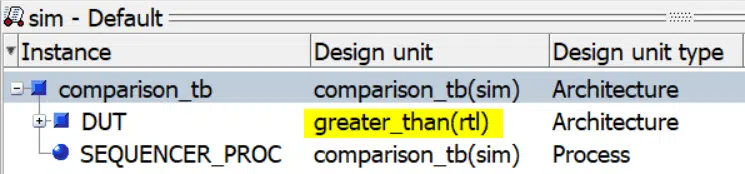
In the console listing above and the Sim tab in ModelSim, we can see that the DUT instance is now greater_than(rtl). Accordingly, it sets q to true only when a is greater than b.
Running the less than testbench
When we run the less than configuration (lt), the Sim tab will look identical to the previous example. That’s because we are still using the greater_than module. But we can see from the printout below that the behavior has changed. It now sets q to true only when a is less than b.
ModelSim> vsim work.lt ; run 100 ns
# vsim work.lt
# Loading std.standard
# Loading work.lt
# Loading work.comparison_tb(sim)
# Loading work.greater_than(rtl)
# ** Note: a = 10, b = 5, q = false
#    Time: 10 ns  Iteration: 0  Instance: /comparison_tb
# ** Note: a = 5, b = 5, q = false
#    Time: 20 ns  Iteration: 0  Instance: /comparison_tb
# ** Note: a = 5, b = 10, q = true
#    Time: 30 ns  Iteration: 0  Instance: /comparison_tb
We have successfully rewired the binding between the testbench and the DUT. With a little imagination, I can think of many clever uses of this in real-life testbenches and modules.
For example, you could use it to simulate an external interface error, a swapped connector. Or you can use it as we did, to repurpose modules into similar tasks.
Other uses of configurations
You can replace other VHDL design elements by using configure blocks, for example, attribute specifications and group declarations. But this article focuses on altering component instantiations. Therefore, we will look at a few other aspects of how you can use configurations for that.
Multiple components at deeper levels
In the example I presented earlier, we replaced the DUT instance in the testbench. But you can also reach deeper into your design hierarchy to pick and choose the components that go into a configuration.
In the example below, I have added another level of nested If statements. Instead of changing the DUT, we are replacing instances inside of it.
configuration gt of comparison_tb is
  for sim
    for DUT : top
      for str

        for COMPARE_1, COMPARE_2 : comparison
          use entity work.greater_than(rtl);
        end for;

        for all : some_component
          use entity work.some_other_entity(rtl);
        end for;

      end for;
    end for;
  end for;
end configuration;
The first For loop matches two specific instances and replaces them with another component. The last For loop uses the all keyword, which will match any instance of the specified type. Now it should be apparent why configure statements use For loops; you can replace multiple instances with a single loop.
Change library imports
Most VHDL tools compile modules into the work library by default. That’s why you will see the work library used without prior import in my VHDL code. It’s available by default. However, some tools use different default libraries. In Xilinx Vivado, the default library is xil_defaultlib.
Let’s imagine that you organize different compiled versions of your modules into separate libraries. Then you can replace all those imports in a configuration, as shown below.
library other_lib;
configuration eq2 of comparison_tb is
  use other_lib.all;
  for sim
  end for;
end configuration;
Instantiating a configuration
I have already shown how we can run a configuration from the simulator console, but you can also instantiate them in your design. The code below shows how we can specify the eq configuration in the VHDL code. It’s like a component instantiation, but you have to use the configuration keyword instead.
DUT : configuration work.eq
port map (
  a => a,
  b => b,
  q => q
);
Final thoughts
I think configurations are a useful tool that I probably should have used more often. Whenever you find yourself maintaining different design versions, you should check if it’s possible to restrict the differences to a few submodules. It may be better to use configurations rather than copying the top module as well.
Furthermore, there is a use case for configurations when experimenting with different versions of your code. You can organize them into separately compiled libraries and easily switch between them.
And finally, configurations are easy to use. It’s an advanced VHDL feature, but it’s straightforward to use once you understand how it works. Go ahead and download the example design by using the form below to see it for yourself!
Need the Questa/ModelSim project files?
Let me send you a Zip with everything you need to get started in 30 seconds
Tested on Windows and Linux Loading Gif..
Let me know your thoughts about configurations in the comment section!