* This article contains an ad link for UpCloud VPS
Continuous delivery and continuous integration are agile software development methodologies that shorten the cycle time between code change and deployment. By using automation to verify code changes and build release files, teams can become more productive and efficient.
Software companies have practiced continuous development for a long time, but you can just as well use the methods for your FPGA projects. This tutorial teaches you how to set up an automation server on a Virtual Private Server (VPS) using Jenkins, Xilinx Vivado, and the Git / GitHub source-control management (SCM) system.
What is Jenkins?
The Jenkins automation server is a free and open-source program written in Java. It runs on Windows or Linux. We will use Linux in this blog post because that’s the most common platform for headless servers.
Jenkins runs as a daemon process in Linux or as a service in Windows. A built-in web server that Jenkins launches when it starts provides the user interface. Most users will interact with Jenkins by using the web interface. You can add new automation projects and manage existing ones through the web GUI.
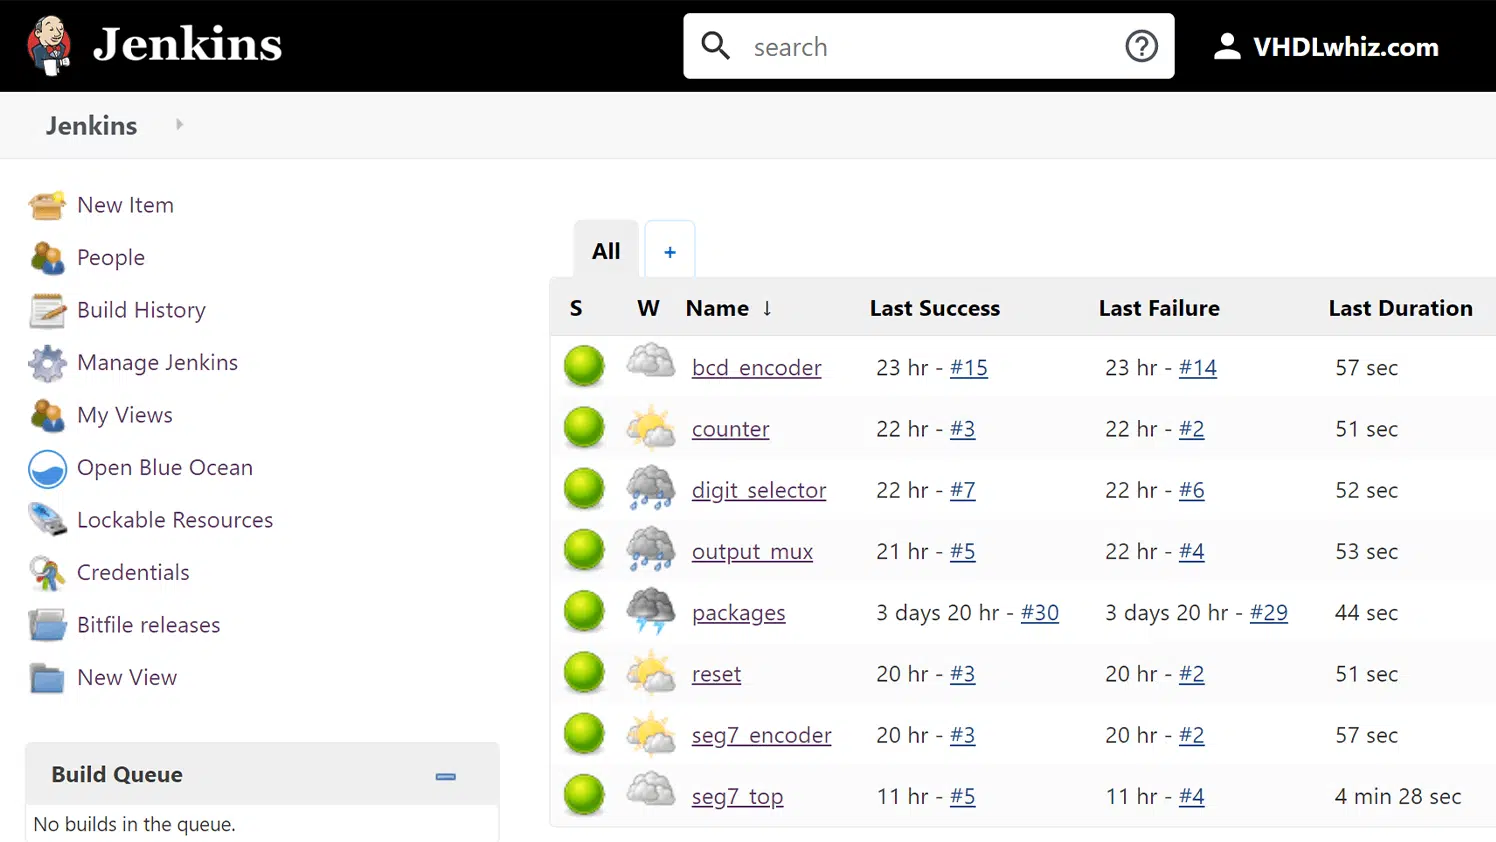
The image above shows the main page of the Jenkins server that we will set up today. By default, only logged in users can access Jenkins, but for this article, I have enabled public access to parts of my *demo server.
* Update: I took down the demo server on May 13, 2020
What you see on the main page is a list of jobs. These jobs can contain any tasks, and they can be triggered manually from the web GUI. Or they can be triggered automatically through scripts, webhooks, or as a result of other jobs completing. Hence the term automation server.
In our example, each job corresponds to a VHDL module kept in a separate GitHub repository. We will make Jenkins run a simulation and build the project whenever a developer pushes code to one of the monitored Git repos. If a testbench fails or if the build breaks, Jenkins will mark the job as failed in the web interface and automatically send an email to the person who committed the faulty code.
The example project
Automation servers are most useful for teams working on larger projects. Therefore, I’ve constructed an example FPGA project that consists of eight Git repositories. The project is the 7-segment display counter from the Fast-Track course ported to the Xilinx ZedBoard.
Links to the eight repos on GitHub:
- packages (VHDL packages)
- bcd_encoder (Module)
- counter (Module)
- digit_selector (Module)
- output_mux (Module)
- reset (Module)
- seg7_encoder (Module)
- seg7 (Top module)
Each repo contains a VHDL module and its testbench. An exception is the packages repo, which contains only three VHDL packages that define constants and types. Additionally, the seg7 top module contains a constraints file that defines the clock speed and pin assignments of the physical implementation.
Most large-scale VHDL projects use modules from more than one repository. Companies typically have a library of packages and modules that they reuse in many designs. That’s what I am emulating by splitting this rather simple design into that many modules.

In our example, all modules are dependent on the packages repo, and the top module depends on all the submodules as well. I have solved this by importing them as needed by using standard Git Submodules. The graph above shows the content and dependencies of all repos in this project.
The Git repositories also contain several non-design files, such as the Jenkins configuration and build scripts. We will talk about them in the upcoming sections of this article.
Virtual private server (VPS)
While Jenkins can run on any Windows or Linux computer, for all practical purposes, you would want to run it on a dedicated server. The automation server has to be always up and running and accessible to all of your team members. If you have a physical server with sufficient capacity lying around, that’s great. But for most of us, a quicker and cheaper solution is to use a virtual private server (VPS).
A VPS is a virtual computer that you rent from a hosting company over the internet. It appears as a real Windows or Linux computer that you can interact with and install whatever software you want. We are going to use a Linux computer because that’s what makes the most sense for our use case.
The VHDLwhiz site is running on a VPS, as it has been for the past two years. I’ve already gone through the trouble of finding the fastest and best VPS provider, which is UpCloud. Naturally, we are going to use UpCloud to set up the VPS for our automation server.
Get the $25 UpCloud bonus
If you wish to try UpCloud, I do have a referral code that will give you $25 worth of credit when signing up.
>> Click here to get the $25 UpCloud bonus <<
Or use my promo code during checkout: NV78V6
By using the code, you will get the bonus and support VHDLwhiz at the same time. I may get some funds credited to my UpCloud account for every customer who uses it.
Okay, enough with the sales talk. Let’s get on with setting up the server.
Deploying the UpCloud VPS
After you have logged in to your new UpCloud account, you can start the process of creating a new VPS instance by navigating to Servers → Deploy server.
UpCloud has many data centers around the world. Select the closest location to you for hosting your new server. Then you have to select a plan for how much resources to give your virtual machine. Jenkins doesn’t use many resources, but Xilinx Vivado is a real RAM hog. Therefore, you should choose at least the plan with 4 GB of RAM, as shown in the image below.

I recommend taking a look at Xilinx’ Memory Recommendations page because memory usage is closely related to the complexity of the target FPGA. The page lists the peak memory usage for the Zynq-7000 XC7Z045 FPGA that I’m using to be 1.9 GB. I found that the 2 GB plan was too little for routing the design. Vivado crashed, and the following message appeared in the dmesg log:
[807816.678940] Out of memory: Killed process 22605 (vivado) total-vm:2046684kB, anon-rss:782916kB, file-rss:308kB, shmem-rss:0kB
Note that you can always upgrade the RAM and CPU resources of your server easily from within your UpCloud account. You won’t automatically get the extra hard drive space that comes with the more costly packages without repartitioning the filesystem of the VPS, but it will run. For reference, I started at the plan with 50 GB storage, and I’ve used 61% of that after completing the entire automation server. Vivado alone takes up 24 GB of space.
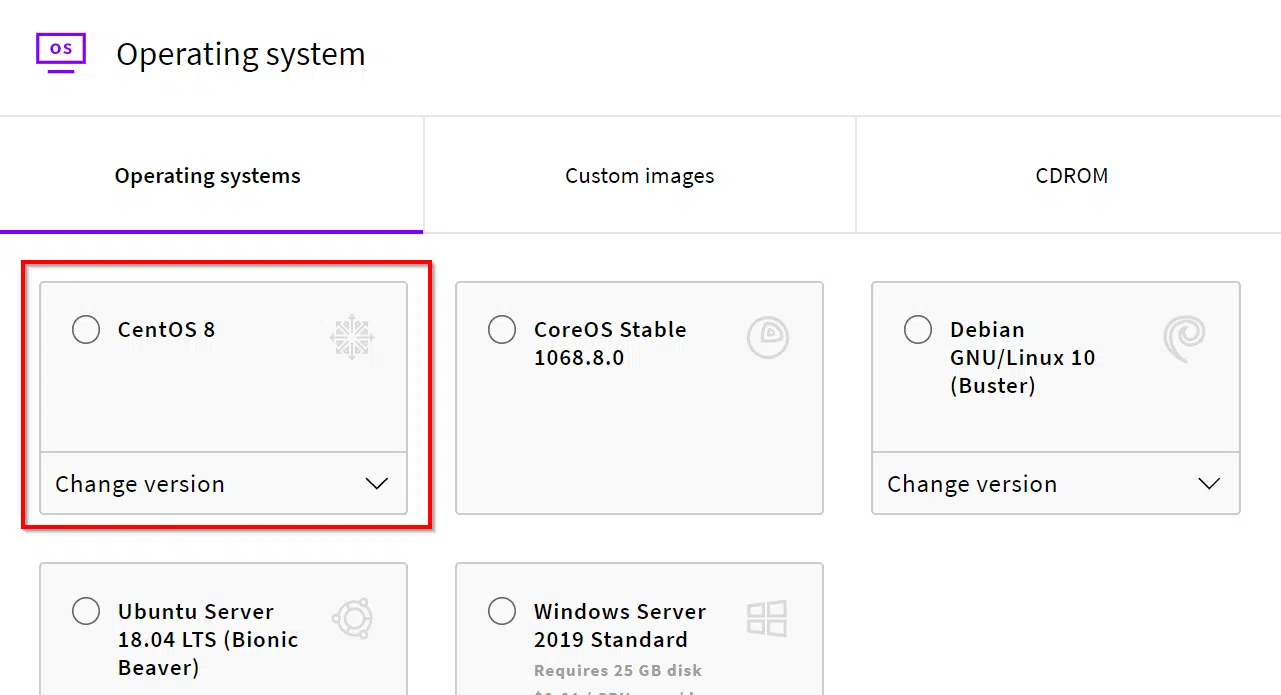
I recommend that you select the latest CentOS Linux distribution as the operating systems, as shown in the image below. Xilinx Vivado officially supports only Red Hat Linux, which is not free. But CentOS is a free, community-supported Linux distribution that closely follows Red Hat.
Then there are some options about networking that you can leave to the defaults. There’s also a section on the web page where you can upload your SSH keys for passwordless login. You can always configure these things later using the conventional Linux method for uploading SSH keys.
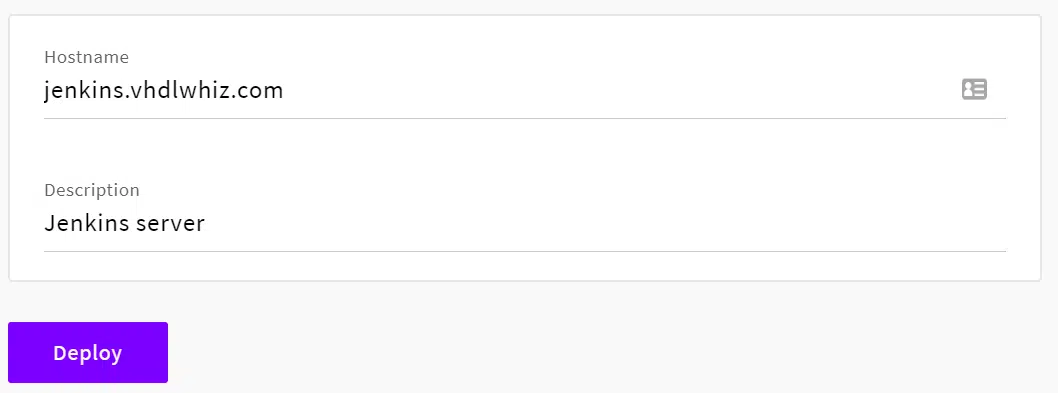
Finally, you need to specify the hostname and name of the server, as shown in the image below. The hostname is the public domain that users will enter into the browser to access the Jenkins server. If you don’t have a domain or subdomain ready, you can always access the server using its IP address. When you are happy with the settings, press the Deploy button to create the server.
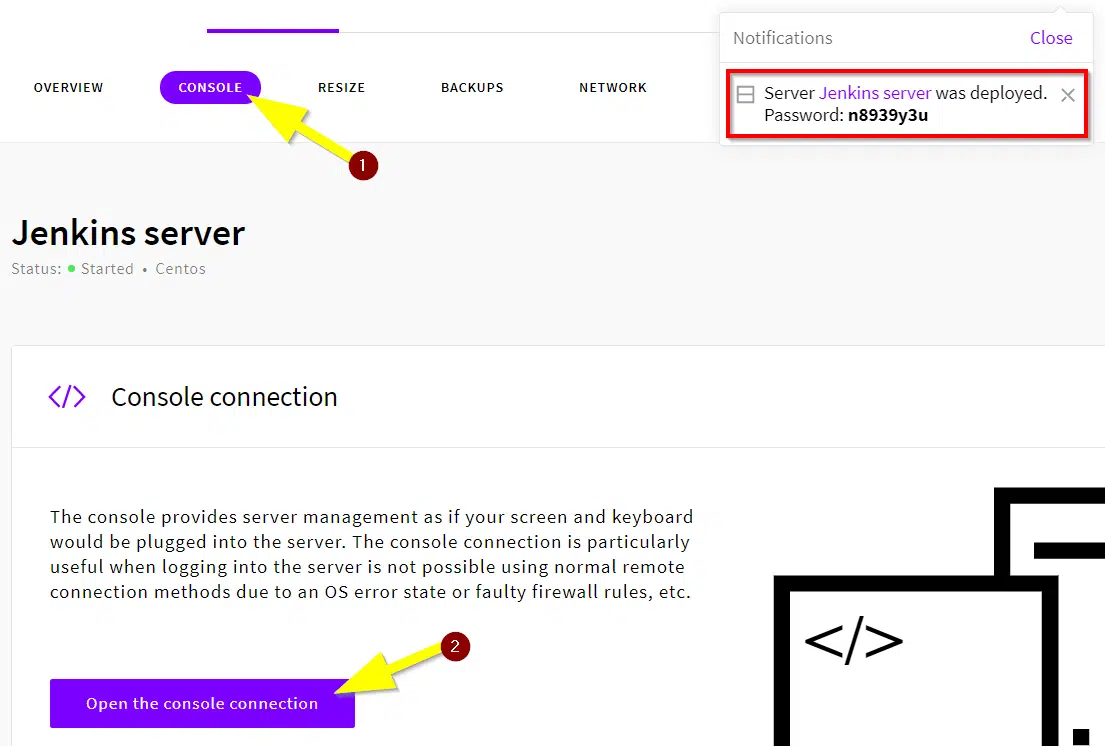
After you have created the server, the autogenerated password will show as a notification. You can change this later, using the Linux passwd command. If you supplied your SSH key before you deployed the server, you won’t need the password at all. Should you ever lose access to your server, you can always log in from within your UpCloud account by hitting Open the console connection, as shown in the image below.
DNS zone settings
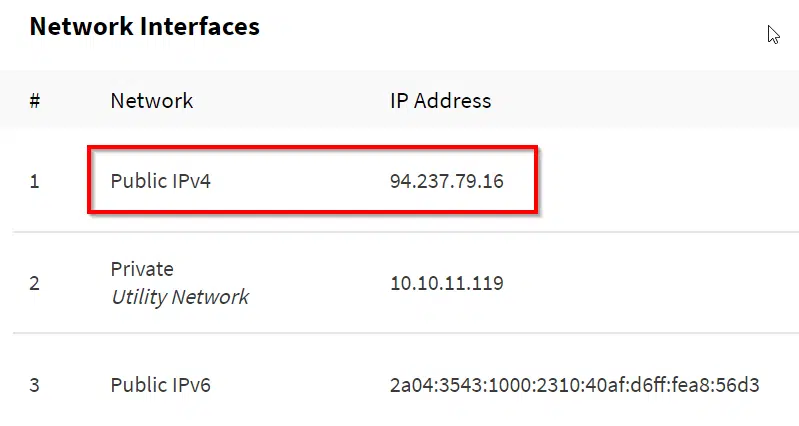
The new server gets assigned permanent IPv4 and IPv6 addresses, found in your UpCloud account at Servers->Network. You can access the server by SSHing into the root account of the public IPv4 address.
By using the example IP address from the image below, the appropriate command to enter in your Linux home computer would be:
ssh root@94.237.79.16
It’s OK to use only the IP address if you are doing this just as an experiment. But a more practical solution is to assign a permanent domain name to the server. To do that, you have to purchase a domain from one of the many registrars that are available online.
Since I already own the vhdlwhiz.com domain, I decided to create a subdomain for the Jenkins server named jenkins.vhdlwhiz.com. We set up the domain name correctly on the UpCloud server when we deployed it. The next thing we need to do is to point the subdomain to the public IPv4 address.
The image below shows the settings that I’m entering in the DNS zone file of my domain name registrar. If I wanted the server to be on the top domain (vhdlwhiz.com), I would have left the hostname field blank. But I want it to be on the “jenkins” subdomain to vhdlwhiz.com. Therefore, I enter the name of the subdomain.

It will take some time after changing the DNS settings before you can use the domain name to access your website. Usually, it takes no more than 20 minutes, but in extreme cases, it can take up to 48 hours for the changes to propagate to every corner of the internet.
When the changes have taken effect, you can use the domain name instead of the IP address when logging in to the server over SSH:
ssh root@yoursub.yourdomain.com
Installing Jenkins
The first thing you should do after logging in to the root account on your new Linux server is to update all of the installed packages. In CentOS Linux, yum is the default package manager. We are going to use the yum command for installing most of the software.
Issue the following command to update all of the installed packages to the latest versions:
yum -y update
Now that we know our system is up to date, we can proceed with the installation. But before issuing the yum command to install Jenkins, we’re going to install Java version 11, explicitly. That’s going to save us some trouble later when we install Xilinx Vivado.
Currently, there is no Java interpreter present on our server, and if we tell yum to install Jenkins, it’s going to install Java version 8. That works well for Jenkins, but it will create problems for us later because Vivado depends on Java version 11.
Install Java 11 using this command before installing Jenkins:
yum -y install java-11-openjdk-devel
Jenkins isn’t available in the default software repository that comes with CentOS. Fortunately, we can import the Jenkins repo from Red Hat by using the following commands:
wget -O /etc/yum.repos.d/jenkins.repo https://pkg.jenkins.io/redhat/jenkins.repo
rpm --import https://pkg.jenkins.io/redhat/jenkins.io.key
Finally, we can go ahead and install Jenkins:
yum -y install jenkins
The Jenkins server will start automatically after the next boot, but you can start the server without rebooting like this:
systemctl start jenkins
You can always check the status of the Jenkins server by using the systemctl command:
systemctl status jenkins
It will print out the status of the server along with any error messages:
● jenkins.service - LSB: Jenkins Automation Server
   Loaded: loaded (/etc/rc.d/init.d/jenkins; generated)
   Active: active (running) since Thu 2020-04-16 04:15:53 UTC; 20min ago
     Docs: man:systemd-sysv-generator(8)
  Process: 1358 ExecStart=/etc/rc.d/init.d/jenkins start (code=exited, status=0/SUCCESS)
    Tasks: 41 (limit: 25029)
   Memory: 1.3G
   CGroup: /system.slice/jenkins.service
           └─1387 /etc/alternatives/java -Dcom.sun.akuma.Daemon=daemonized -Djava.awt.headless=true -DJENKINS_HOME=/var/lib/jenkins -jar /usr/lib/jenkins/jenkins.war --log>;

Apr 16 04:15:52 jenkins.vhdlwhiz.com systemd[1]: Starting LSB: Jenkins Automation Server...
Apr 16 04:15:52 jenkins.vhdlwhiz.com runuser[1365]: pam_unix(runuser:session): session opened for user jenkins by (uid=0)
Apr 16 04:15:53 jenkins.vhdlwhiz.com runuser[1365]: pam_unix(runuser:session): session closed for user jenkins
Apr 16 04:15:53 jenkins.vhdlwhiz.com jenkins[1358]: Starting Jenkins [  OK  ]
Apr 16 04:15:53 jenkins.vhdlwhiz.com systemd[1]: Started LSB: Jenkins Automation Server.
[root@jenkins ~]#
Jenkins over insecure HTTP
At this point, Jenkins is running on port 8080 on the VPS, but you have no way of connecting to it with your web browser. That’s because the CentOS firewall blocks port 8080 and port 80 (HTTP) by default. What we can do to fix that is to open port 80 in the firewall and reroute it to port 8080 using iptables.
But before you do that, you’ve got to decide if you want to secure your site with HTTPS. The problem with using only HTTP and port 80 is that your website is going to be insecure. If you’re accessing it using public Wi-Fi, a malicious person on the same Wi-Fi with a laptop and readily available hacking software can eavesdrop on your connection and steal your login credentials to Jenkins.
If you want to avoid the security risk of unencrypted HTTP, skip to the next section about setting up HTTPS for Jenkins. Otherwise, keep reading.
Enabling insecure HTTP access to Jenkins is as easy as issuing the following commands:
firewall-cmd --permanent --zone=public --add-port=80/tcp
firewall-cmd --reload
iptables -A PREROUTING -t nat -i eth0 -p tcp --dport 80 -j REDIRECT --to-port 8080
Then you can enter your domain name in your favorite browser, and the Jenkins Getting Started page should appear. At least in Google Chrome, the “Not secure” warning will be displayed in the address bar, as shown in the image below.

Skip ahead to the Setting up Jenkins section if you’re happy with that.
Jenkins over secure HTTPS
Having an unsecured website that’s accessible to the public is a huge security risk. Jenkins can access your source code, and so can any hacker who successfully breaks into the server. Fortunately, securing the website is only a few copy-pasted commands away.
Jenkins can’t handle HTTPS on its own. Therefore, we have to install a generic web server to reroute requests that arrive over the secure channel to the insecure Jenkins server. I will use Nginx, which is one of the most popular free and open-source web servers today.
Issue the following command to install and start Nginx:
yum -y install nginx
systemctl start nginx
Then we need to open both the HTTP and HTTPS ports in the firewall. We will only be serving HTTPS requests, but we need to keep the HTTP port open as well because we will configure Nginx to redirect all insecure requests to the secure port.
These commands will open the firewall for web traffic:
firewall-cmd --permanent --zone=public --add-port=80/tcp
firewall-cmd --permanent --zone=public --add-port=443/tcp
firewall-cmd --reload
The next step is to install a certificate that web browsers can use to certify that it’s your website they are interacting with and not an imposter. We’re going to use the free Let’s Encrypt certificate authority to secure our site. The individual steps are complicated, but luckily, certbot provides a script that can do it for us automatically.
Download and prepare the script with the following commands:
apt update
apt install snapd
snap install core; snap refresh core
snap install --classic certbot
Next, run the script, which will install the certificate and make the necessary changes to the Nginx config file:
certbot --nginx -d jenkins.vhdlwhiz.com
As the script runs, it will prompt you for information. Answer affirmative (Yes, Accept) to all questions until you get asked to choose whether or not to redirect HTTP traffic to HTTPS. The listing below shows the questions, and my suggested answer (2). Allowing Nginx to redirect insecure requests makes sure that no one can explicitly enter http://yoursite.com and get to the insecure version of Jenkins. Nginx will redirect them to the secure version.
...
Deploying Certificate to VirtualHost /etc/nginx/nginx.conf

Please choose whether or not to redirect HTTP traffic to HTTPS, removing HTTP access.
- - - - - - - - - - - - - - - - - - - - - - - - - - - - - - - - - - - - - - - -
1: No redirect - Make no further changes to the webserver configuration.
2: Redirect - Make all requests redirect to secure HTTPS access. Choose this for
new sites, or if you're confident your site works on HTTPS. You can undo this
change by editing your web server's configuration.
- - - - - - - - - - - - - - - - - - - - - - - - - - - - - - - - - - - - - - - -
Select the appropriate number [1-2] then [enter] (press 'c' to cancel): 2
Finally, you should enable a cron job to renew the certificate periodically. Otherwise, it will expire, and browsers will refuse to open your site at all.
Issue the following one-liner command to add the daily cron job:
echo "0 0 * * * /snap/bin/certbot renew --quiet" | crontab -
The cron daemon will run the renew script daily at midnight. You can list the cron jobs with the crontab -l command and edit them with the crontab -e command. If you visit your website now, you will see the Nginx test page, and not Jenkins. We will fix this shortly, but make sure that the “Not secure” warning is gone from the Chrome address bar, as the image below shows.

To make Nginx serve Jenkins, you need to make some changes to the /etc/nginx/nginx.conf file. Credit for this code snippet goes to Kerren’s blog on Medium. Using the nano editor is probably the easiest way to edit the config file:
nano /etc/nginx/nginx.conf
Locate the server block that lists your domain name and add the highlighted lines from the listing below to your nginx.conf file. Note that the first of the three new lines go above the server block, and the rest goes into the root location block.
upstream jenkins {
    server 127.0.0.1:8080 fail_timeout=0;
}

server {
    server_name jenkins.vhdlwhiz.com; # managed by Certbot
    root         /usr/share/nginx/html;

    # Load configuration files for the default server block.
    include /etc/nginx/default.d/*.conf;

    location / {
        proxy_set_header        Host $host:$server_port;
        proxy_set_header        X-Real-IP $remote_addr;
        proxy_set_header        X-Forwarded-For $proxy_add_x_forwarded_for;
        proxy_set_header        X-Forwarded-Proto $scheme;
        proxy_set_header        Upgrade $http_upgrade;
        proxy_set_header        Connection "upgrade";
        proxy_pass              http://jenkins;
    }
After you have updated the config file, you need to reload Nginx for the changes to take effect. Optionally, you can test the config file before reloading by using the command:
nginx -t
Nginx will print out OK or tell you on which line in the nginx.conf file the error is. When you are happy with the changes, you can reload the web server by giving the following command:
systemctl reload nginx
When you now visit the Jenkins site in your browser, you should see the Getting Started page of Jenkins, as shown in the image below. This time it’s served over a secure connection, and we can safely continue to configure Jenkins from within the web GUI interface.
Setting up Jenkins
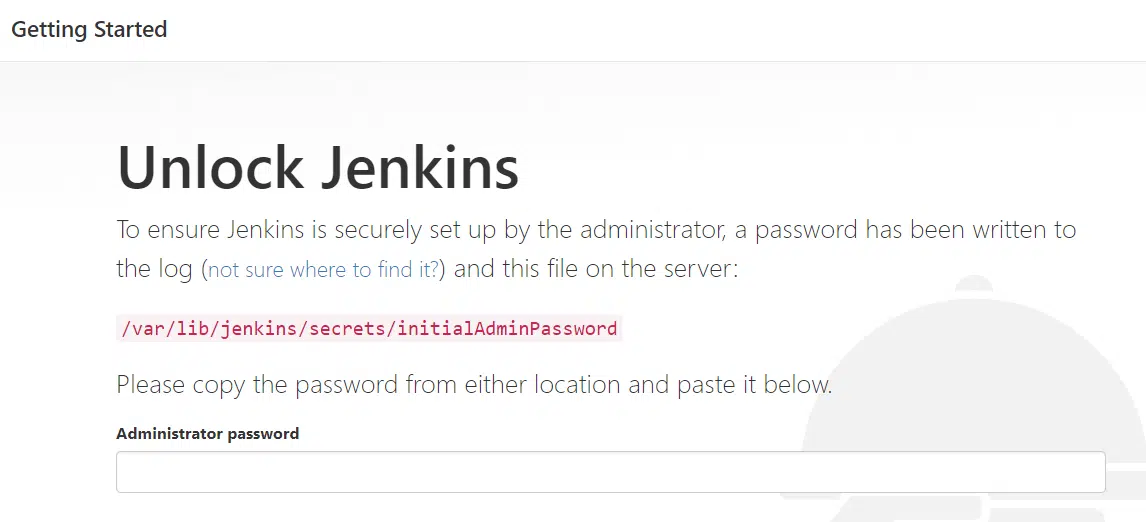
The first time you visit your Jenkins website, it will prompt you for a password found in a file on the Linux file system. While logged in over SSH, use the command below to show the password. Copy-paste it into the browser to gain access to the web GUI:
cat /var/lib/jenkins/secrets/initialAdminPassword
On the next screen, Jenkins will ask if you want to install the suggested plugins, or if you want to specify which to install. Just go with the Install suggested plugins option for now. You can always add or remove plugins later.
On the next page, you must create an admin user. Fill in your details and create a strong password to use with your new account. By default, only logged in users can access the Jenkins server. Anonymous users will only see the login dialog if they venture to your website. The only reason why you could access my *demo site jenkins.vhdlwhiz.com is that I’ve made changes to the server. I used the Matrix Authorization Strategy plugin to grant anonymous access to some views.
* Update: I took down the demo site on May 13, 2020

When Jenkins is done installing plugins, you will see the “Jenkins is ready!” message, as shown in the image above. Click the button that will take you to the empty overview page of your fresh Jenkins installation.
Installing Jenkins plugins
The first thing you need to do is to install a bunch of plugins. Jenkins has a built-in plugin manager that you can use for installing, updating, and removing extensions. You will find plugins that can take care of most of your needs. Just use the search function in the plugin manager when you need to add functionality to Jenkins.
Let’s go on to install the plugins that I used when setting up the example Jenkins server. From the sidebar, chose Manage Jenkins->Manage Plugins->Available. Note that no plugins are listed unless you enter something in the search field. Once you type, they will appear.
Blue Ocean
The first plugin I recommend to install is named Blue Ocean. This plugin is a modernization of the Jenkins workflow as well as the user interface. It also pulls in a bunch of other useful plugins so that you don’t have to install them individually. Search for “blue ocean” in the plugin manager and select it for installation, as shown in the image below.

On the installation progress page that appears after you click install, you have the option to select Restart Jenkins when installation is complete and no jobs are running. If you check the box next to it, Jenkins will restart after the plugin installation is complete. Another way of restarting Jenkins is to log in on the server over SSH and run the following command:
systemctl restart jenkins
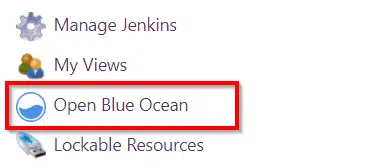
Apart from the long list of other plugins that were installed by Blue Ocean, there’s no noticeable change at first glance. But there will be a new menu item in the sidebar, as shown in the image below. When clicked, it will take you to the Blue Ocean GUI, which looks quite different from the Normal Jenkins interface. Try it!
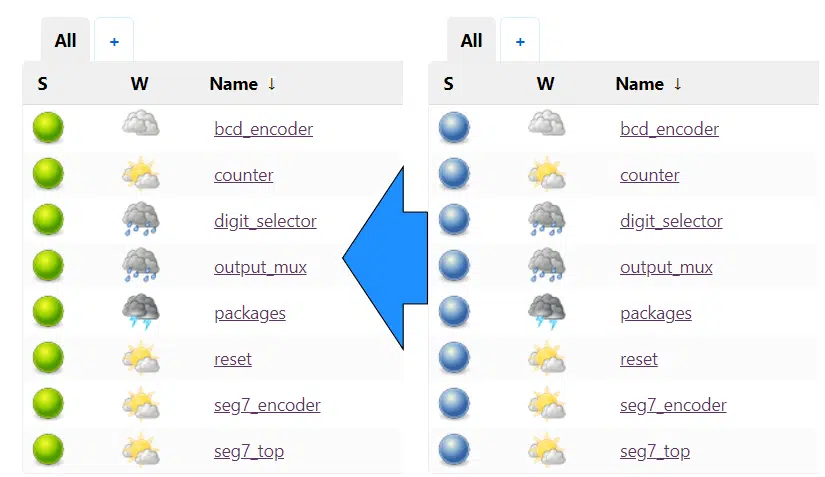
Green Balls
The next plugin I always install is purely for esthetics. The Green Balls plugin doesn’t require any configuration. Simply search for “green ball” in the plugin manager and install it as shown in the image below.

By default, Jenkins uses blue color balls in the overview page to indicate that the status of a job is successful. The reason has something to do with that the inventor of Jenkins is Japanese. Interestingly, in Japan, the color blue is interchangeable with green when it comes to indicating an OK status. More on that in this article, where you can hear the author explain the reason first-hand.
Users from most other parts of the world would probably prefer green status balls. That’s easily fixed by the Green Balls plugin, as shown in the image below.
Locale plugin
The next plugin that I installed is named Locale. Search for “locale” under the Available tab in the plugin manager. Install the plugin, as shown in the image below.

The plugin lets you force Jenkins to use the same language in the GUI for all users. By default, Jenkins translates the user interface to the language that your web browser is using. I’m Norwegian, but I would rather have Jenkins in English. The translation was a bit inadequate. Also, it’s so much easier to google for answers in English if you need to find out how to do something in Jenkins.
Of course, it’s entirely up to you if you want this plugin. If you install it, you need to navigate to Manage Jenkins->Configure System and find the section named Locale. Then, you need to enter “en_US” (or whatever language you want) and check the box below to force this language to all users, as shown in the image below. Don’t forget to scroll to the bottom of the page and click Save.

Sidebar Link
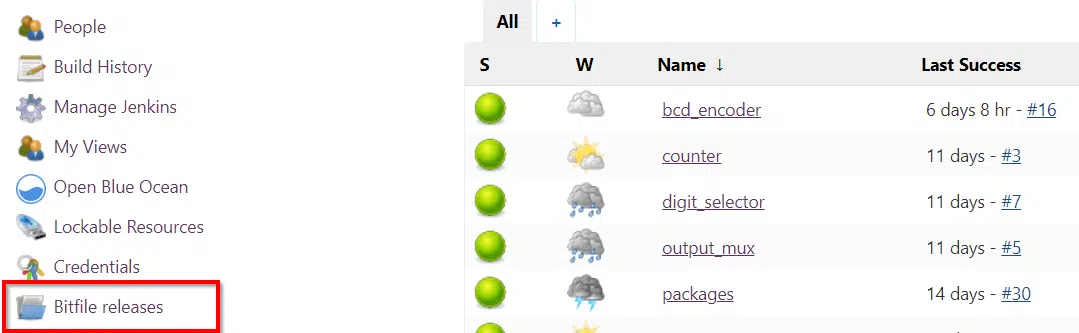
The final plugin that you need to clone my setup is the Sidebar Link plugin. It lets you add custom links to the Jenkins sidebar. We will use it later to add a link to the FPGA releases (bitfiles). Search for “sidebar” in the plugin manager and install the plugin, as shown in the image below.

Connecting Jenkins to GitHub
Regardless of whether your repository is public or private, you need to give Jenkins some permissions on your GitHub account. At least if you want to do it in the easiest possible way, you should let the Jenkins GitHub plugin manage the interface with GitHub for you. Blue Ocean has already installed the GitHub plugin. These are the steps to configure it.
First, you should install Git on your system. The GitHub plugin does not strictly need it, but when you start working with Jenkins jobs, you have to have it. Issue this command to install Git in CentOS Linux:
yum -y install git
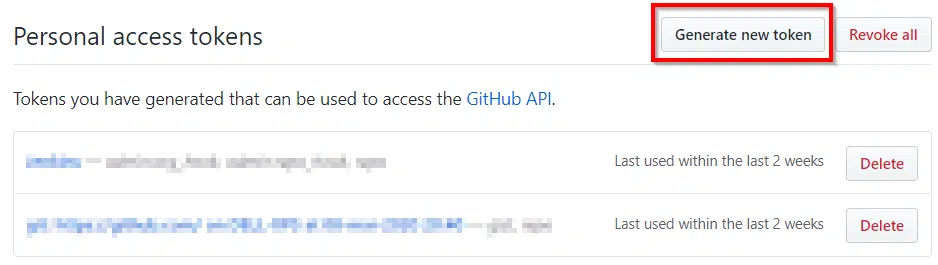
Personal access token in GitHub
Sign in to GitHub, click your profile picture in the top right corner, chose settings, and go to Developer Settings. Then, choose Personal access tokens from the left sidebar menu, or click this link that will take you directly there.
Here, you need to click Generate new token, as shown in the image below. GitHub will ask you for your password once again. What you are doing now is essentially creating a new, application-specific password. That’s better than sharing your actual password because you can revoke it, and you can limit the permissions granted to the token. That’s what we will do on the page that opens up.
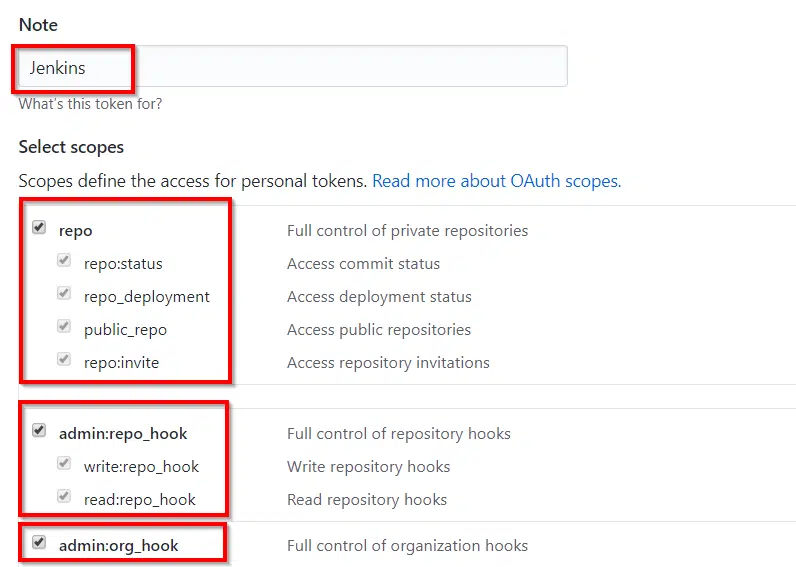
When you have entered your password, you need to give the token a name. The name is just for you. It can be anything, “Jenkins,” for example. Then, you must enable at least the admin:org_hook, admin:repo_hook, and repo permissions, as shown in the image below. You can leave all the other boxes unchecked.
Finally, when you click Generate token, the access code will appear. You need to copy it before you leave that page because it’s not possible to see it again. If you forget it, delete the token and recreate it.
Entering the GitHub credentials in Jenkins
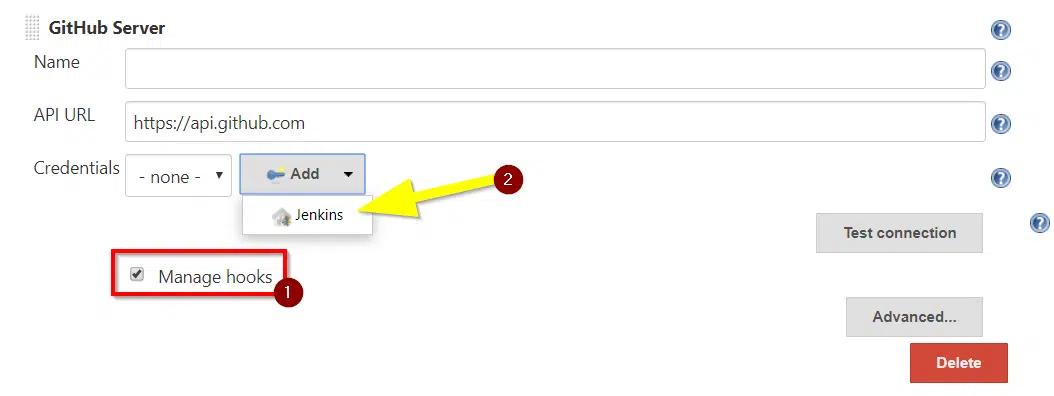
When you have copied the token, go to Jenkins, select Manage Jenkins->Configure System, and find the section named GitHub, as shown in the image below. From the dropdown menu, select Add GitHub Server->GitHub Server.

In the new GitHub Server section that appears, check the box labeled Manage hooks. When you do this, Jenkins will install webhooks on GitHub for repos you are monitoring. We shall see later that this is particularly useful because we will use them to trigger a simulation or build in Jenkins when a user pushes code to the associated GitHub repository.
Select Credentials (Add)->Jenkins after you have checked the box, as shown in the image below.
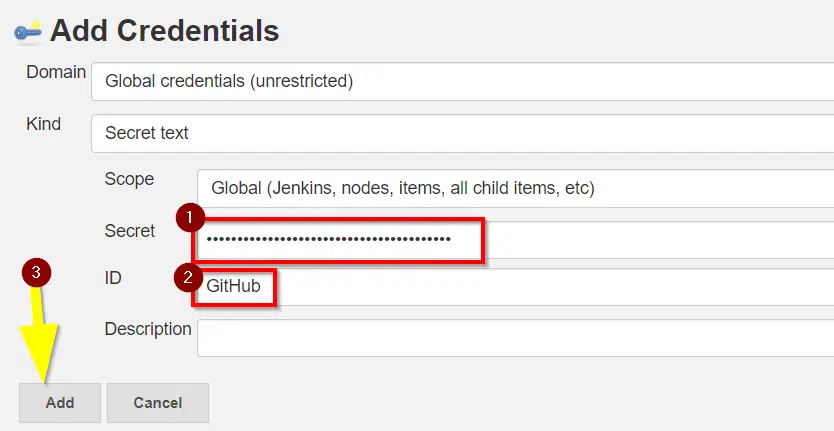
In the window that opens, change the Kind dropdown to Secret text. Then, paste in the personal access token that you previously generated in GitHub in the Secret field. Write “GitHub” in the ID field and press Add.
Finally, when you’re back in the main config menu, after adding the secret text, select the new GitHub key from the Credentials menu. Then, press Test connection to verify that Jenkins can talk to GitHub using the access token. If everything went well, you should see a message like the one shown in the image below.
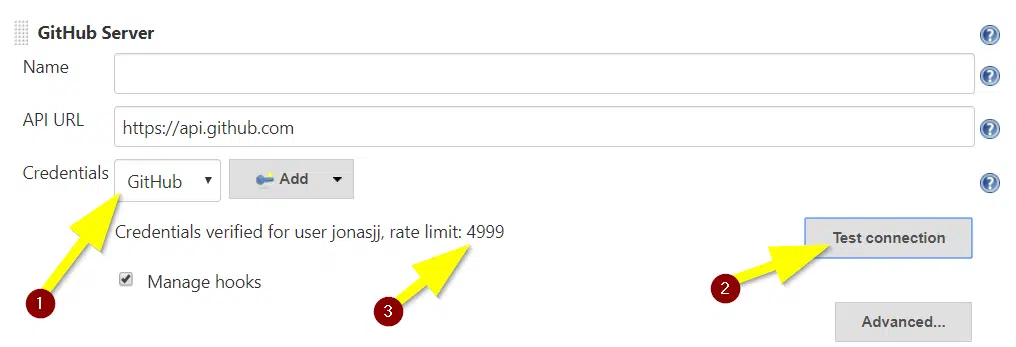
Make sure to scroll to the bottom of the page and click Save before leaving the config page.
If you run into trouble and end up adding multiple credentials, you can delete them by going to Manage Jenkins->Manage Users, and click your user name. Now, in the left sidebar, there will be a menu item named Credentials. From there, you can view and edit all keys that Jenkins has stored.
Sending email from Jenkins
We are going to configure Jenkins to send automated emails when something breaks in your code. To make that happen, we need to make some changes in the Manage Jenkins->Configure System menu.
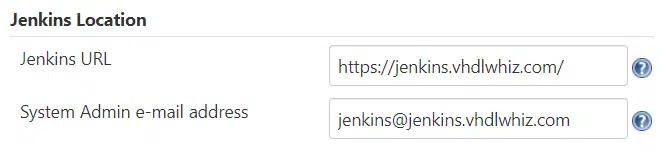
The first thing you should do is to enter the from-address that Jenkins will use when sending automated emails. Find the System Admin e-mail address field on the config page, and enter the address you would like Jenkins to send from.
Just a quick note: it’s best to enter an address that ends with the Jenkins domain name. That minimizes the chance of the email ending up in the spam folder. The Jenkins server doesn’t have permission to send emails on behalf of other domains, but most email services accept from-addresses with the same domain as the sending server. Read more about that in this Wikipedia article. In the image below, I’ve entered a from-address ending with the same domain as the Jenkins server.
Next, we need to give Jenkins a way to send emails. The most straightforward way to do that is to install an SMTP (mail) server on the VPS. You can do that by logging in and issuing the following commands:
yum -y install sendmail
systemctl enable sendmail
systemctl restart sendmail
After you have installed sendmail, go back to the Jenkins system configuration and enter “localhost” in the SMTP server field, as shown in the image below.
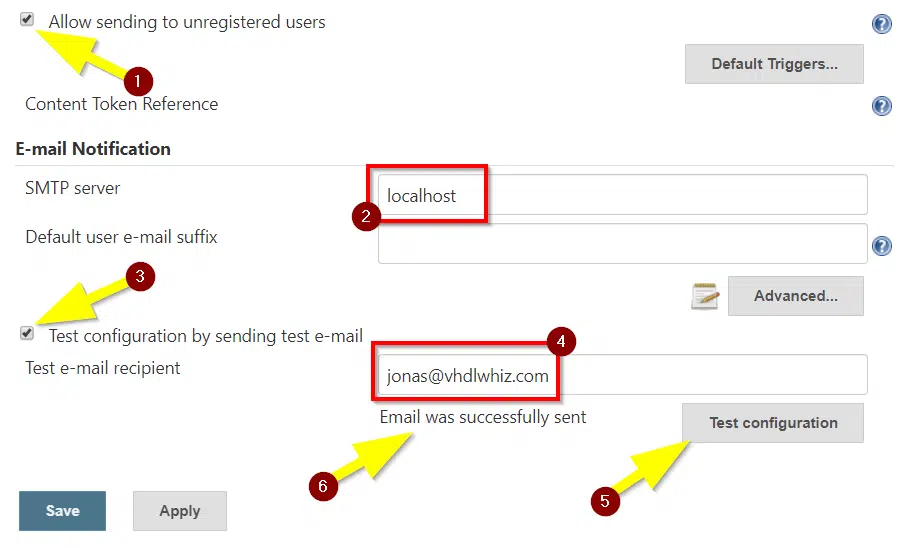
At this point, you can also check the box to allow sending to unregistered users. That means users that don’t have a Jenkins user account. Later, we will configure Jenkins to send an email to any person who pushes faulty code to GitHub. Jenkins will get the email address of the culprit from GitHub, but that will only work if the person has a matching Jenkins account, or if we check this box.
Finally, you can test the configuration, as shown in the image above. After you press Test configuration, the message “Email was successfully sent” should appear, and the email should reach your inbox. Check your spam folder if you don’t receive the email within five minutes.
Installing Xilinx Vivado in batch mode
I’m using Xilinx Vivado to simulate, compile, and implement the code in this example project. The target device is the Xilinx Zynq-7000 FPGA on the ZebBoard development board. In this section, I will show you how to install Vivado on the VPS using the free WebPACK license.
The first step is to download the Xilinx Unified Installer: Linux Self Extracting Web Installer, shown in the image below. You will need to log in or create a new Xilinx account to download the installer.

When the download has completed, you must copy it from your desktop computer to the Jenkins server. If you have access to a Linux shell on your desktop, I suggest using secure file copy as in the following command:
scp Xilinx_Unified_2019.2_1106_2127_Lin64.bin root@jenkins.vhdlwhiz.com:~/
Before you can run the installer, you need to install a few packages to satisfy Vivado’s dependencies. Run the following commands to do that:
yum -y install tar
yum -y install java-11-openjdk-devel
yum -y install ncurses-compat-libs
yum -y install gcc
Then, run the Xilinx Unified installer like this:
./Xilinx_Unified_2019.2_1106_2127_Lin64.bin --keep --noexec --target Xil_installer
The .bin file will unpack the installation files to a new directory named Xil_installer. If you get the error listed below instead, it’s because you haven’t installed tar.
Verifying archive integrity... All good.
Uncompressing Xilinx InstallerExtraction failed.
Terminated
The Xilinx Unified installer can install many different Xilinx tools on your system. Therefore, we must run the xsetup file in the Xil_installer directory to specify which software we are interested in:
cd Xil_installer/
./xsetup -b ConfigGen
The xsetup script prompts you for which tools you would like to have. Enter “2” for Vivado, and then “1” for Vivado HL WebPACK, as shown in the listing below.
Select a Product from the list:
1. Vitis
2. Vivado
3. On-Premises Install for Cloud Deployments
4. BootGen
5. Lab Edition
6. Hardware Server
7. Documentation Navigator (Standalone)

Please choose: 2

Select an Edition from the list:
1. Vivado HL WebPACK
2. Vivado HL Design Edition
3. Vivado HL System Edition

Please choose: 1
To install the Xilinx WebPACK edition, you must log in to your Xilinx account during the install. On a desktop computer, the installer GUI guides you through this process, but on the server, there’s no GUI, so we have to authenticate by using the xsetup script. Run the following command to generate the authentification token:
./xsetup -b AuthTokenGen
I had to run the command a few times before it worked. At first, the script stopped with the error “Internet connection validated, can connect to internet.” However, after a few tries, I got through, and I was able to sign in. The script will ask for your user ID and password. That’s the email and password that you used for downloading the installer from xilinx.com.
Finally, you are ready to install Vivado in batch mode. When calling the setup script, you have to specify the installation config file so that xsetup knows which tools to download. The config file is in the .Xilinx folder in the home directory of the root user. Run the following command to start the installation using the config file:
./xsetup -a XilinxEULA,3rdPartyEULA,WebTalkTerms \
    -b Install -c ~/.Xilinx/install_config.txt
The installation process will take a long time to complete. The Vivado installation uses 24 GB of space. All of that is now downloading from the relatively slow Xilinx server. For me, the download took just over two hours.
After the installation is complete, you should test that Vivado starts successfully in batch mode. Xilinx provides a shell script that sets up the environment for you. Before you can run Vivado, you need to use the source command to load the content of the script into your active shell:
source /tools/Xilinx/Vivado/2019.2/settings64.sh
Then, you are ready to run Vivado. But there’s no GUI environment installed on your server, so we have to start it in batch mode by using this command:
vivado -mode batch
If Vivado starts and exists immediately without printing any errors, it’s an indication that Vivado has everything it needs, and you are ready to go. Note that if you are getting the error listed below, it’s because you haven’t installed the ncurses-compat-libs package, as we talked about at the start of this section.
application-specific initialization failed:
couldn't load file "librdi_commontasks.so":
libtinfo.so.5: cannot open shared object file: No such file or directory
Integrating Vivado in Jenkins
To prepare Jenkins for Vivado, we need to make some changes to the general settings. Head to Manage Jenkins->Configure System and check that all the default settings make sense for you.
As I mentioned earlier, Vivado uses a lot of RAM. The resource usage depends on your target FPGA, and you can get an indication of how much you need from the Xilinx Memory Recommendations page. Therefore, I recommend that you change the default number of parallel jobs that can run from 2 to 1. Unless you allocated vast RAM resources on your VPS, you probably want to set # of executors to 1, as shown in the image below.

Instead of defining the environment variables in every Jenkins job, we will specify the PATH globally for all jobs. That makes it easier for you to swap to a newer version of Vivado in the future. Then you can refer to the ‘vivado’ executable in your scripts, and it will always point to the latest version, or whichever you decide.
Scroll to the Global properties section and check Environment variables. Click Add to get a new entry. Make sure to include the standard Linux PATH as well. I used “PATH=/tools/Xilinx/Vivado/2019.2/bin:/sbin:/usr/sbin:/bin:/usr/bin”, as shown in the image below.

Don’t forget to scroll to the bottom of the page and click Save.
Vivado GUI projects in batch mode
I chose to manage the Vivado projects in GUI mode. For each repository, I created a new project from within the regular Vivado GUI, adding source files, setting libraries, and all of that. However, the .xpr project files are binary and depend on a lot of other temporary files in the project directory.
Binary files are not suitable for SCMs like Git. Fortunately, Xilinx has thought of this and written a guideline (XAPP1165) for how to use Vivado with version control systems. What we do is to use the write_project_tcl command in Vivado to export the entire project into a Tcl script. The script contains human-readable Tcl code suitable for Git.
I’ve organized all of the Git repos so that all files that belong to the Vivado projects are in a subfolder named “vivado”, while the VHDL source files are in the parent directory. Check out the demo packages project on my GitHub to see what I mean. For each repo, we will put the Vivado Tcl scripts in the vivado folder. You will also find the create_vivado_proj.tcl file, which is the human-readable version of the Vivado project.
To create the create_vivado_proj.tcl file, start by setting up the Vivado project as you wish in the Vivado GUI. Make sure that the Vivado project resides within a vivado subfolder. When you’re happy with the project, export it by entering the following commands in the Vivado Tcl console:
cd [get_property DIRECTORY [current_project]]
write_project_tcl -force -target_proj_dir . create_vivado_proj
Add the create_vivado_proj.tcl file to Git, and set up the gitignore to ignore the rest of the Vivado project. Here’s the content of my .gitignore file which ignores everything but Tcl scripts in the vivado folder:
vivado/*
!vivado/*.tcl
Opening the Vivado project in batch mode
It’s a good idea to test the Vivado project manually on the VPS before you start creating Jenkins jobs. By default, the daemon runs from a user account named jenkins on the Linux server. Therefore, you should test the Vivado project using the jenkins user.
Make sure that you have Git installed on the Linux server before you start this experiment. Run this command to install Git after logging in as root:
yum -y install git
You can’t log in to the jenkins user directly, but you can change to it from the root user like this:
su - jenkins -s/bin/bash
If you now run a pwd command, you will see that you are at /var/lib/jenkins:
[jenkins@jenkins ~]$ pwd
/var/lib/jenkins
That’s because this isn’t a regular user account that has the home directory under /home, as is the norm on Linux systems. It’s only for running the Jenkins daemon, but we can log in to perform a manual walkthrough of the build process in the Jenkins environment.
The home folder is full of all the dynamic data like logs, user settings, and plugins that you have downloaded. When we later start running jobs in the Jenkins GUI, they will appear in the jobs folder.
Let’s go to the jobs folder to perform our experiment:
cd /var/lib/jenkins/jobs/
You can clone your Git repository directly into the jobs folder. Your Git repo has to be accessible without using a password. Either because it’s public, or because you have set up passwordless login as described on the GitHub help pages.
If you don’t have a Git repository with the Vivado project ready, feel free to clone one of my repos like this:
git clone https://github.com/jonasjj/Jenkins-demo-packages
Then, cd into the new directory of the Git repository, and further into the vivado folder:
cd Jenkins-demo-packages/vivado/
If you downloaded my example, you would find two Tcl files: create_vivado_proj.tcl and check_syntax.tcl. The first one is the Vivado project converted to a Tcl file, and the second one is a script that we haven’t talked about yet. It’s for checking the syntax of VHDL files in the Vivado project.
Before we can run any Vivado command, we need to set the PATH environment variable in the current shell. In Jenkins, we solved this by using Global properties, but now we are not coming through Jenkins, so we have to source the setup script from Xilinx like this:
source /tools/Xilinx/Vivado/2019.2/settings64.sh
Now that the vivado executable is in our path, let’s start by recreating the project. This is the command for doing that when running Vivado in batch mode:
vivado -mode batch -source create_vivado_proj.tcl
After you hit Enter, you should see a whole lot of Tcl code echoed to the console. It’s the code for recreating the Vivado project that’s executing. If you didn’t see any obvious errors, type the command “echo $?” in the terminal before you do anything else. The output should be 0 if everything went well, as we can see from the listing below.
INFO: [Common 17-206] Exiting Vivado at Sun Apr 19 18:32:48 2020...
[jenkins@jenkins vivado]$ echo $?
0
The “echo $?” command shows you the exit status from the previous command that you executed in Linux. An exit status of 0 means that everything is OK, no error. Any other exit status than 0 is an indication of error. Those are old Unix conventions that you can read more about here. Anyway, the exit status is important for Jenkins because that’s how it decides if a job stage is a success or a failure.
If you now do a directory listing, you will see that Vivado has recreated the project’s binary files:
[jenkins@jenkins vivado]# ls -la
total 72
drwxrwxr-x. 6 jenkins jenkins  4096 Apr 19 18:32 .
drwxrwxr-x. 4 jenkins jenkins  4096 Apr 19 18:18 ..
-rw-rw-r--. 1 jenkins jenkins   217 Apr 19 18:18 check_syntax.tcl
-rw-rw-r--. 1 jenkins jenkins 23375 Apr 19 18:18 create_vivado_proj.tcl
drwxrwxr-x. 3 jenkins jenkins    16 Apr 19 18:32 packages.cache
drwxrwxr-x. 2 jenkins jenkins    26 Apr 19 18:32 packages.hw
drwxrwxr-x. 2 jenkins jenkins     6 Apr 19 18:32 packages.ip_user_files
-rw-rw-r--. 1 jenkins jenkins  9314 Apr 19 18:32 packages.xpr
-rw-rw-r--. 1 jenkins jenkins   638 Apr 19 18:32 vivado.jou
-rw-rw-r--. 1 jenkins jenkins 20153 Apr 19 18:32 vivado.log
drwxrwxr-x. 2 jenkins jenkins     6 Apr 19 18:32 .Xil
Let’s try another experiment with running Tcl scripts in Vivado batch mode. Create a one-liner Tcl script by using the following command:
echo "exit 1" > test.tcl
Now, run the script in Vivado batch mode:
vivado -mode batch -source test.tcl
After Vivado closes, check the exit code once more using the “echo $?” command:
[jenkins@jenkins vivado]# echo $?
1
It’s 1, which means exit failure in Unix. If you change the content of the test.tcl script to “exit 0”, and run Vivado once again, you will see that the exit status is now 0, indicating success. Try it!
The exit keyword is standard Tcl. We are going to use it as the interface between Vivado and Jenkins. Jenkins runs whatever Tcl script we create in Vivado, and looks at the exit status to determine if it shall mark the job stage as success or failure.
Remember to delete our little test project from the jobs folder when you are happy with the experiment:
cd /var/lib/jenkins/jobs/
[jenkins@jenkins jobs]# rm -rf Jenkins-demo-packages
Tcl script for checking code syntax in Vivado
This Tcl script runs a syntax check of the VHDL files in the project. If you are going to simulate or implement the code, you won’t need this script because any syntax errors will break the compilation. But for my packages project, it doesn’t make any sense to create a testbench for it. The files just contain constant and types declarations. I still want to catch any coding errors pushed to this repo, and that’s where the syntax check comes in handy.
In the script that is listed below, we start by opening the project file. Then, we call the Vivado check_syntax command while telling it to save the output to a variable called msg. After the check has completed, we look at the output message to see if there were any errors reported. If check_syntax reported anything at all, we set the exit status to 1 (failure). If there were no errors, we exit 0 (success).
check_syntax.tcl:
# Check for syntax errors
# Return exit code 1 on error, else 0

open_proj packages.xpr

set msg [check_syntax -fileset sim_1 -return_string]
set ret_val 0

if {$msg != ""} {
  set ret_val 1
}

puts $msg
exit $ret_val
Vivado supports all of the standard Tcl keywords, and there are also a lot of built-in commands like check_syntax. I recommend taking a look at these two Xilinx documents that cover the Tcl scripting capabilities in great detail:
Vivado Design Suite Tcl Command Reference Guide (UG835)
Vivado Design Suite User Guide Using Tcl Scripting (UG894)
Tcl script for simulating in Vivado
The next script that I created is for running the testbench in batch mode. For this to work, you have to configure the simulation sets in the Vivado GUI before you export the project to Tcl. Go ahead and recreate one of the simulation projects on your desktop computer using the create_vivado_proj.tcl script to see how I set it up beforehand. You can open the reconstructed projects in the Vivado GUI.
As you can see from the listing below, I start by opening the project. Then, I set the name of the simulation fileset to a variable (usually sim_1). After we launch the simulation, we also have to close it. Otherwise, the status of the simulation won’t get written to the log files.
run_simulation.tcl:
open_proj seg7.xpr

set sim_fileset sim_1

launch_simulation -simset [get_filesets $sim_fileset]
close_sim

# Look for assertion failures in the simulation log
set log_file [glob *sim/$sim_fileset/behav/xsim/simulate.log]
set fp [open $log_file]
set file_data [read $fp]
exit [regex "Failure:" $file_data]
Now, I struggled to find a good way of getting the simulation status. My VHDL testbenches terminate on a VHDL finish keyword on success. Errors will result in a VHDL assertion failure. There’s no obvious way to find out why the simulator stopped by using Tcl commands in Vivado.
Fortunately, Tcl is a powerful scripting language. My workaround is to open the simulation log and look for the string “Failure:”, which indicates a VHDL assertion failure. Finally, we exit 1 if the word is in the log, or 0 if it isn’t.
Tcl script for synthesizing in Vivado
In the Tcl script for synthesizing in Vivado batch mode, we start by opening the project file. Then, We assign the run name to a variable. You must have added the design files to the Vivado project before you exported it to Tcl. If you didn’t change the name of the synthesis run in the GUI, it’s will probably be “synth_1”.
You should set the CPU count variable to the number of logical processors that your server has. This number controls the degree of multithreading that Vivado uses. I opted for the VPS with 4 CPUs on UpCloud, and therefore set the CPU count to 4.
run_synthesis.tcl:
open_proj seg7.xpr

set run_name synth_1
set cpu_count 4

reset_runs $run_name
launch_runs $run_name -jobs $cpu_count
wait_on_run $run_name

set status [get_property STATUS [get_runs $run_name]]
if {$status != "synth_design Complete!"} {
  exit 1
}
exit 0
The launch_runs command is non-blocking, meaning that it will complete before the actual synthesis. If we try to read the status right after calling launch_run, it will be “Running”. To pause the script until the synthesis completes, we call the wait_on_run command.
Finally, we get the run status and exit 0 or 1, depending on the status message.
Tcl script for running the implementation in Vivado
The script for running Place and Route (PAR) in Vivado batch mode is similar to the synthesis script. The difference is that the run name is now “impl_1”, and that we are looking for another success message.
run_implementation.tcl:
open_proj seg7.xpr

set run_name impl_1
set cpu_count 4

reset_runs $run_name
launch_runs $run_name -jobs $cpu_count
wait_on_run $run_name

set status [get_property STATUS [get_runs $run_name]]
if {$status != "route_design Complete!"} {
  exit 1
}
exit 0
Tcl script for generating the bitstream in Vivado
Finally, after if the implementation completes successfully, we can generate a bitstream for programming the FPGA. The script is similar to the previous one, but the launch_runs command is slightly different. And of course, we are looking or a different status in the end.
generate_bitstream.tcl:
open_proj seg7.xpr

set run_name impl_1
set cpu_count 4

launch_runs $run_name -to_step write_bitstream -jobs $cpu_count
wait_on_run $run_name

set status [get_property STATUS [get_runs $run_name]]
if {$status != "write_bitstream Complete!"} {
  exit 1
}
exit 0
Setting up the Jenkins jobs
A job in Jenkins refers to a set of grouped software tasks. Jenkins displays jobs and their current status as items listed on the overview page. You can start jobs manually from the web interface, or they can be triggered automatically, for example, when someone pushes code to a repo, or as a result of another job completing. We will do both.
Jenkins offers several ways of managing jobs. The traditional method is the Freestyle project, where you specify every action from within the Jenkins web GUI. The more modern way of managing Jenkins jobs is to use a pipeline script that stores all of the information about the execution flow. The pipeline scripts have the benefit that you can add them to your SCM.
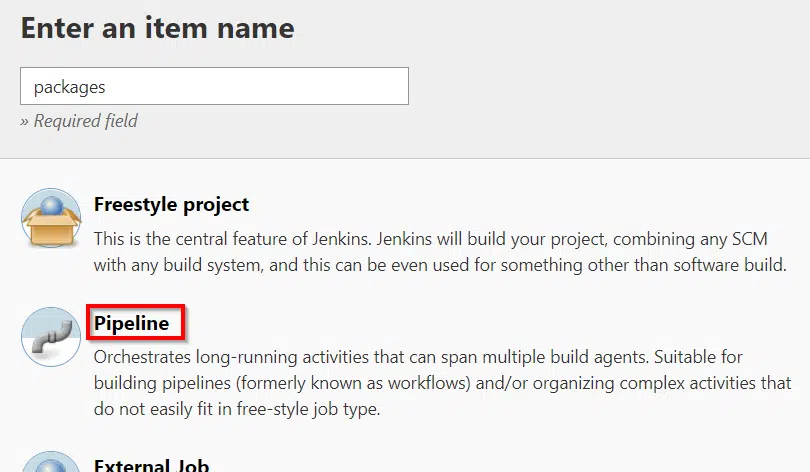
To create a new pipeline script, select New item from the Jenkins sidebar. In the dialog that opens, select the Pipeline option and click OK, as shown in the image below.
The first thing we have to do in the job configuration is to add the GitHub repository that contains the source code. In this example, I am using the packages repo, but the procedure is the same for all the other jobs and repos. Check the GitHub project box and enter the address in the Project url field that appears, as shown in the image below.

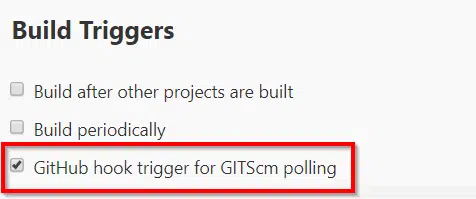
After that, we can set up the build triggers for this job. I want this job to start when someone pushes code to the GitHub repo. To do that, we check the box that says GitHub hook trigger for GITScm polling, as shown in the image below. Note that this will only work if you have checked the Manage hooks box in the global settings, as we did earlier.
At the bottom of the job configuration page is the Pipeline section. Here, you have to option to enter the pipeline script directly into the config page. But we want to version control the pipeline script. Therefore, we chose the Pipeline script from SCM option. Make sure that Git is selected, as shown in the image below.
Paste in the URL of your GitHub repository, and select your credentials if it’s a private repo. Ours is public, so we will leave the credentials blank. We will also go with the default master branch selection.

Finally, we have to select the path to the Jenkins script within the Git repository. I have created a file named Jenkinsfile at the root of each repo. Don’t forget to click Save before you leave the page.
Jenkins pipeline scripts
Pipeline scripts follow the same syntax rules as the Apache Groovy programming language, which I must admit I had never heard of before. Nevertheless, you won’t have a hard time understanding pipeline scripts if you’ve done any kind of modern programming. At first glance, it looks like a JSON schema without the commas separating the data items.
The scripts are quite versatile, and there are many options for things like executing stages in parallel or running tasks on multiple Jenkins servers. I suggest that you take a look at the official Jenkins pipeline documentation if you want to dig deeper into the matter.
Fortunately, you don’t need to know everything about them to benefit from pipeline scripts. We will use the format below as a template for all of your scripts. We will add as many stages as we need to split the job into logical steps.
pipeline {
  agent any

  stages {
    stage('Stage name 1') {
      steps {
        // Command 1
        // Command 2
        // Etc.
      }
    }
    stage('Stage name 2') {
      steps {
        // Command 1
        // Command 2
        // Etc.
      }
    }
  }
  post {
    failure {
      emailext attachLog: true,
      body: '''Project name: $PROJECT_NAME
Build number: $BUILD_NUMBER
Build Status: $BUILD_STATUS
Build URL: $BUILD_URL''',
      recipientProviders: [culprits()],
      subject: 'Project \'$PROJECT_NAME\' is broken'
    }
  }
}
If somebody pushes faulty code to the repo, we want the culprit to receive an automated email with information about the failed job. To do that, we use a failure section within a post section. This part of the script will only execute if any of the stages fail. Then, the job will stop. Jenkins won’t go to the next stage if one fails. Instead, it will jump into the failure section. Jenkins then lifts the email addresses from the latest Git commits and sends them an email with a link to the broken build.
VHDL syntax checking job
The only repo in our design that doesn’t have a testbench is the packages repo—instead, we user our check_syntax.tcl script to verify that the code is at least valid VHDL.
In the first step of our pipeline script, we call deleteDir(). That’s one of the basic commands available in Jenkins pipeline scripts. It cleans the working directory by removing any leftover from previous builds.
On the next line, we call git. Note that this is not the git Linux command, but a command referencing the git Jenkins plugin. We tell it to clone the repository into the workspace.
Finally, on the third line of the Create project stage, we use the sh keyword to call a Linux shell command. Here, we change to the vivado directory and run the create_vivado_proj.tcl script in Vivado batch mode to recreate the Vivado project.
Jenkinsfile:
pipeline {
  agent any

  stages {
    stage('Create project') {
      steps {
        deleteDir() // clean up workspace
        git 'https://github.com/jonasjj/Jenkins-demo-packages'
        sh 'cd vivado && vivado -mode batch -source create_vivado_proj.tcl'
      }
    }
    stage('Check VHDL syntax') {
      steps {
        sh 'cd vivado && vivado -mode batch -source check_syntax.tcl'
      }
    }
  }
  post {
    failure {
      emailext attachLog: true,
      body: '''Project name: $PROJECT_NAME
Build number: $BUILD_NUMBER
Build Status: $BUILD_STATUS
Build URL: $BUILD_URL''',
      recipientProviders: [culprits()],
      subject: 'Project \'$PROJECT_NAME\' is broken'
    }
  }
}
In the second stage, the one named Check VHDL syntax, the Vivado project already exists, so we can jump to running our Tcl script. We use the shell command again to run the check_syntax.tcl file, which will exit 0 on success, or 1 on error, causing Jenkins to mark the build as a failure.
VHDL simulation jobs
For all other jobs than the packages repo, the git one-liner command won’t work for checking out the code from GitHub. The problem is that these repos have dependencies in the form of submodules. The submodules reference other Git repositories, which the simple git command doesn’t pull by default. But that’s OK; we can fix the issue by using the more versatile checkout call, also well-documented on the Git plugin page.
Jenkinsfile;
pipeline {
  agent any

  stages {
    stage('Create project') {
      steps {
        deleteDir() // clean up workspace
        checkout([$class: 'GitSCM', branches: [[name: '*/master']],
          doGenerateSubmoduleConfigurations: false,
          extensions: [[$class: 'SubmoduleOption',
            disableSubmodules: false,
            parentCredentials: false,
            recursiveSubmodules: true,
            reference: '',
            trackingSubmodules: true]],
          submoduleCfg: [],
          userRemoteConfigs: [[
            url: 'https://github.com/jonasjj/Jenkins-demo-bcd_encoder']]])
        sh 'cd vivado && vivado -mode batch -source create_vivado_proj.tcl'
      }
    }
    stage('Run simulation') {
      steps {
        sh 'cd vivado && vivado -mode batch -source run_simulation.tcl'
      }
    }
  }
  post {
    failure {
      emailext attachLog: true,
      body: '''Project name: $PROJECT_NAME
Build number: $BUILD_NUMBER
Build Status: $BUILD_STATUS
Build URL: $BUILD_URL''',
      recipientProviders: [culprits()],
      subject: 'Project \'$PROJECT_NAME\' is broken'
    }
  }
}
Finally, we run the run_simulation.tcl script in Vivado in the next stage.
The above listing shows the script used in the bcd_encoder repo. Identical scripts, only with different repo URLs, are used for the counter, digit_selector, output_mux, reset, and seg7_encoder repos as well.
FPGA implementation job
The seg7 repo contains the top module for our FPGA project. It pulls in all of the other repos as submodules. The pipeline script is similar to the one used for the simulation-only jobs, but with four added stages: Run simulation, Run implementation, Generate bitstream, and Release bitfile.
The first two stages create the project and run the simulation. I have already covered how they work in the previous sections of this article. The next three stages work the same way as the simulation stage, but with the Tcl script replaced with the ones that are relevant for the task.
Jenkinsfile:
pipeline {
  agent any

  stages {
    stage('Create project') {
      steps {
        deleteDir() // clean up workspace
        checkout([$class: 'GitSCM', branches: [[name: '*/master']],
          doGenerateSubmoduleConfigurations: false,
          extensions: [[$class: 'SubmoduleOption',
            disableSubmodules: false,
            parentCredentials: false,
            recursiveSubmodules: true,
            reference: '',
            trackingSubmodules: true]],
          submoduleCfg: [],
          userRemoteConfigs: [[
            url: 'https://github.com/jonasjj/Jenkins-demo-seg7']]])
      sh 'cd vivado && vivado -mode batch -source create_vivado_proj.tcl'
      }
    }
    stage('Run simulation') {
      steps {
        sh 'cd vivado && vivado -mode batch -source run_simulation.tcl'
      }
    }
    stage('Run synthesis') {
      steps {
        sh 'cd vivado && vivado -mode batch -source run_synthesis.tcl'
      }
    }
    stage('Run implementation') {
      steps {
        sh 'cd vivado && vivado -mode batch -source run_implementation.tcl'
      }
    }
    stage('Generate bitstream') {
      steps {
        sh 'cd vivado && vivado -mode batch -source generate_bitstream.tcl'
      }
    }
    stage('Release bitfile') {
      steps {
        sh '''
        PROJ_NAME=seg7
        RELEASE_DIR=/usr/share/nginx/html/releases/

        BASE_NAME=$PROJ_NAME-`date +"%Y-%m-%d-%H-%H:%M"`
        BITFILE=$BASE_NAME.bit
        INFOFILE=$BASE_NAME.txt

        git log -n 1 --pretty=format:"%H" >> $INFOFILE
        echo -n " $PROJ_NAME " >> $INFOFILE
        git describe --all >> $INFOFILE

        echo "" >> $INFOFILE
        echo "Submodules:" >> $INFOFILE
        git submodule status >> $INFOFILE

        cp $INFOFILE $RELEASE_DIR
        cp vivado/seg7.runs/impl_1/top.bit $RELEASE_DIR/$BITFILE
        '''
      }
    }
  }
  post {
    failure {
      emailext attachLog: true,
      body: '''Project name: $PROJECT_NAME
Build number: $BUILD_NUMBER
Build Status: $BUILD_STATUS
Build URL: $BUILD_URL''',
      recipientProviders: [culprits()],
      subject: 'Project \'$PROJECT_NAME\' is broken'
    }
  }
}
The final stage of the implementation job is named Release bitfile. It contains a shell script that copies the newly generated FPGA programming file to a release folder. The shell command renames the file to include the name of the project and a timestamp.
To maintain traceability, we also generate a text file that contains the Git hash of the main repo (seg7) and all of the submodules. When working with Git submodules, it’s not enough to store the hash of the main repo. To generate a hash for the main repo that includes changes in all submodules, we would have to commit the main repo after pulling and updating all submodules. We don’t want to do that automatically from Jenkins.
Note that implementing the FPGA for every single push, like I am doing in the example, is probably not what you want for a real-life Jenkins project. It can take hours to build a large-scale FPGA project, and that wouldn’t work when you have a team of developers pushing multiple times per day. Instead of building after each push to the repo, you can configure Jenkins to route the FPGA only once a day. For example, at midnight, as shown by the screenshot below from the job configuration page.

Triggering builds after other jobs complete
Our example project consists of several Git repositories, but they are all tied together as Git submodules. Except for packages, all the other repos depend on at least one other repository. Most depend on the packages repository. Have a look at the dependency graph that I presented earlier in this article to see how it all fits together.
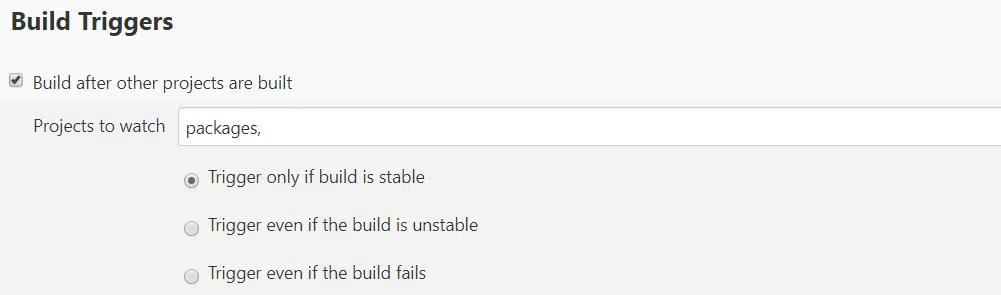
Therefore, we should trigger jobs not only by pushes to the repo in question but also after any of the submodules are touched. We can achieve this in Jenkins by visiting every job and setting the Build after other projects are built option accordingly.
The image below shows the trigger for the bcd_encoder project. It will start after the packages repo, which it depends on, completes a build successfully.
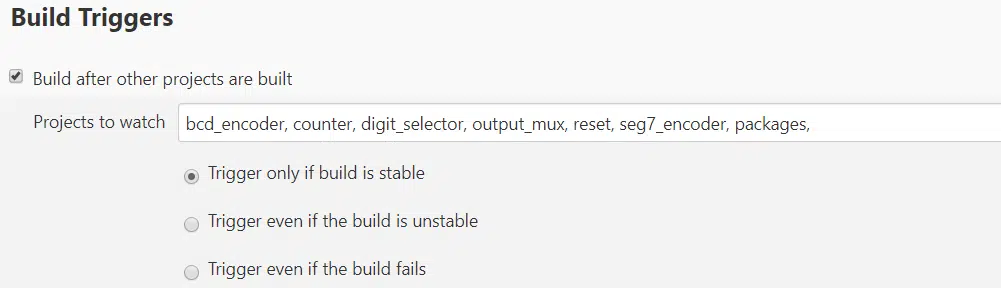
The top module depends on all other repos. I have added them as watch projects in a comma-separated list, as shown in the image below. Note that you may not want to do this for the FPGA implementation job if it takes a long time to route, as I mentioned in the previous section.
Serving the bitfiles using Nginx
Since we already have a web server running, we can use if for serving the release files over HTTP. I want all new bitfiles to appear on the URL jenkins.vhdlwhiz.com/releases. Let’s see how we can use Nginx for this.
Our implementation job already copies new bitfiles to a directory on the Nginx HTML root, but we haven’t created it yet. Create the release dir and give the Jenkins user write permissions by issuing the following commands:
mkdir /usr/share/nginx/html/releases/
chown jenkins.root /usr/share/nginx/html/releases/
Then we have to make a change to the /etc/nginx/nginx.conf file. Find the server section in the config file with a name equal to your domain. Add the following location section inside of it, directly below the root (‘/’) location section:
location ^~ /releases {
    alias /usr/share/nginx/html/releases/;
    autoindex on;
}
Finally, after you have saved the file, test the configuration file, and reload the Nginx server:
nginx -t
systemctl reload nginx
If everything worked, you should be able to list the content of the release directory, as shown in the screenshot below from Google Chrome.

Custom link in the sidebar
To tie the Jenkins web interface to the release dir, I want to create a link to if from the Jenkins sidebar. We have already installed the Sidebar Link plugin that enables custom links in the sidebar.
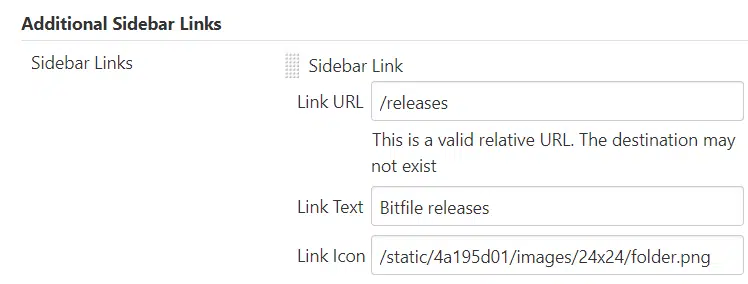
The next step is to go to Manage Jenkins->Configure System and scroll down to the Additional Sidebar Links section. Here, we can specify the name and URL of the new link, as shown in the image below. The link icon field is optional. I reused one of the icons that came with the Jenkins server.
After completing the previous step, you should now have a custom link to the bitfile releases in the sidebar, complete with a nice-looking folder icon, as you can see from the image below.
Summary
Jenkins can be a valuable tool also for FPGA teams. Automating tasks can save your company time and improve the quality of your code. By using automatic build triggers and automated job pipelines, fewer coding errors will go unnoticed.
As we have seen from the example project presented in this article, Jenkins can implement a complete suite of regression tests for your VHDL code. It shows the current health of your project in a pleasant graphical web interface, suitable for even the most VHDL-illiterate project manager.
If you wish to try out Jenkins for FPGA development, I recommend following the steps in this article on an UpCloud VPS instance. I thoroughly researched all VPS providers a few years ago before moving VHDLwhiz to a VPS. I found that UpCloud was the fastest and best alternative. I’m still 100% pleased with the service.
If you decide to open an account on UpCloud, I kindly ask that you use my referral link or code: NV78V6. Not only do you support VHDLwhiz, but you also get $25 of credit on UpCloud when using the promo code.


Hi Jonas, great to see this blog post and thank your something a lot more interesting to read than all the news at the moment! You’ve given us at least three tutorials in one here: VPS, Jenkins and running Vivado with TCL (maybe four: using Vivado with github). Even if we don’t all get around to having a Jenkins server on a VPS, your easy examples of running basic Vivado procedures from TCL are fantastic.
For a while I have been a creating a zip_file of the Vivado project directory and committing the zip file to the git repository whenever I make significant changes. I make the Vivado project directory itself an ignored location in .gitignore, and naturally keep the VDHL files (and my waveforms as it happens) in folders outside of the Vivado project. Pulling the project onto a different machine requires a second step of unzipping the Vivado project again. This approach is basic and it has kept things straightforward for me until now, but I really should try your way of doing it.
Thank you again and keep up the good work!
Hello Andrew,
Thanks for the nice comment, and I’m glad you liked the tutorial!
At first, I thought about splitting this article into multiple blog posts, but I realized that some of the steps don’t make sense as stand-alone posts. For example, the section about setting up the VPS. It doesn’t have anything to do with FPGA or VHDL. Without the context of what comes later, it doesn’t belong on this blog. In the end, I created this tutorial instead, which I’m happy with.
I have to say that I’m guilty of committing the entire Vivado project on several occasions. ? But that was before I heard about the write_project Vivado command. Vivado restores your project perfectly when you run the script.
What I didn’t mention in the article is that for some of the Vivado projects, I just copied the create_vivado_proj.tcl file and edited it. I didn’t create ALL of the projects in the GUI. All the simulation projects (bcd_encoder, counter, …) are similar; they have different names and source files but are otherwise equal. So you can create a template Vivado project and edit it or create it on the fly using scripts. Lots of possibilities. ?
Hi,
i had some problems with git and the graphical design in IP Integrator.
The files generated by write_project_tcl threw errors when importing on other machines.
This is a more polished variant that uses the supplied write_project_tcl command.
https://github.com/barbedo/vivado-git
Maybe you could give it a try and compare to your current approach?
Hello, I tried to add an IP Integrator block design to one of my projects. I opened the ‘packages’ project from this article and added a ZYNQ7 Processing System to it.
I was able to export the project using the write_project_tcl command in the Vivado GUI on my Windows PC. Then I copied it to the Jenkins Linux server and recreated it. And finally, I exported it to Tcl, copied it back to the Windows computer, and opened the project. That seemed to work nicely.
However, I can easily imagine that problems can arise when using custom IP blocks. Unfortunately, the issues are probably too specific to your design that anyone can give general advice on how to fix it.
I tested the barbedo script, and it worked, but so did the standard method. Perhaps you can create a post on the Xilinx forum with more details about the issues you are experiencing.
Hi Jonas,
Great tutorial. I was waiting someone to write something about it.
I have not yet skills to develop my own blog, but I am tempted.
Probably I am the only who is facing this issue: I am stuck at the VPS step.
I am not able to contact the Jenkns server on VPN. It seems like the step of enabling 80 and 8080 ports
have not been done, but this is the case. I was trying the easy way: no https.
What will you recommend to check further?
If you connect to “http://94.237.91.200” the Nginx server will reply, but “http://94.237.91.200:8080”
doesn’t reply at all.
Thanks anyway for the great post!
Luca
Hello Luca,
I think there’s some conflict of ports on your server at the moment. If you used the iptables command, Jenkins wouldn’t respond on the default port 8080 anymore. It’s now on port 80, which is the same as Nginx is using. I’m not sure why Nginx takes precedence, though.
To solve the conflict, you can first list your iptables config like this:
Then, if you see a redirect of port 80/http, delete it by referencing the line number (1):
Now, Jenkins is back on port 8080, but the CentOS firewall is blocking it. Open port 8080 like this:
Jenkins should now be accessible on port 8080 and Nginx on port 80.
If you want Jenkins on port 80 without Nginx (HTTPS), you can simply stop the Nginx service and reroute port 8080 to 80 again:
service nginx stop
firewall-cmd --permanent --zone=public --add-port=80/tcp
firewall-cmd --reload
iptables -A PREROUTING -t nat -i eth0 -p tcp \
    --dport 80 -j REDIRECT --to-port 8080
And finally, if you mess up everything, the quickest solution is to create a new VPS instance and delete the old one. You are paying UpCloud by the hour. Experimenting with multiple machines doesn’t cost much. You can also take backups in your UpCloud account and revert to the snapshot when something goes wrong.
I set up a Jenkins server in 10 minutes to write this comment. I created a new CentOS image and pasted in the following commands:
yum -y update
yum -y install java-11-openjdk-devel
wget -O /etc/yum.repos.d/jenkins.repo \
    https://pkg.jenkins.io/redhat/jenkins.repo
rpm --import https://pkg.jenkins.io/redhat/jenkins.io.key
yum -y install jenkins
systemctl start jenkins
firewall-cmd --permanent --zone=public --add-port=80/tcp
firewall-cmd --reload
iptables -A PREROUTING -t nat -i eth0 -p tcp \
    --dport 80 -j REDIRECT --to-port 8080
Good luck, and tell me how it goes. ?
That’s it!!!! Incredibly fast solution.
Thanks Jonas.
Luca
I’m following your tutorial, running Jenkins over HTTPS using Nginx. However, I couldn’t connect to the Jenkins server, and I looked in the file /var/log/nginx/error.log and found this:
connect() to 127.0.0.1:8080 failed (13: Permission denied)
I found the problem to be related to selinux, and the solution was to run this command:
setsebool -P httpd_can_network_connect 1
Hello Michael,
Thank you for sharing the solution. I’m sure it will help some other readers that stumble across your comment. ?
You have a done a super job explaining Jenkins and steps for setting it up for an FPGA project from begining to end on a new VPS. Thank you for taking the time and effort to do this; it will be very useful as I try to replicate something similar on a Window machine.
Thanks, I’m glad you found my article to be helpful. Jenkins and Vivado work on Windows too. I’m sure you will figure something out. ?
By the way, you can still use a VPS like Upcloud. They also have Windows servers if you prefer that.
Hi I was trying to build a FPGA project in vivado and then run Spyglass analysis on it once a code is pushed into Gilab…I am unable to link the workspace of jenkins to the lsf workspace where i have cloned my git project. as a result i am getting path or directory not found error for the pipeline job. Also Is there any way to run spyglass analysis? When i use the following commands in my script..it gives me errors and the job fails. Any suggestions?
bsub -Is -q i_soc_rh7 -R “rusage[mem=25600]” spyglass
source spyglass.tcl
Hi Jonas,
Thanks for your work, that’s probably one of the best tutorials I’ve ever read! I read it just for informational purposes, to get acquainted with the Jenkins+Vivado combination.
Best regards,
Anton